Want to learn guitar but don't know where to start? This guide walks you through the first essential steps — perfect for beginners who want to make quick progress.
You'll receive valuable insights on choosing the right guitar, proper playing and posture techniques, and how to read music and tablature. You'll also learn how to play chords, take care of your guitar, and discover the secrets of effective practice to continuously improve your playing. Let's get started!
Find the right learning method: Whether you’re self-taught, learning in a course or with a teacher – choose the method that suits your learning style and goals.
Choose the right guitar and accessories: Pick between acoustic and electric guitar and get key accessories like strings, tuner, and picks for a smooth start.
Master basic techniques: Focus on posture, strumming, and essential chords to lay the foundation for many songs.
Read music and tablature: Learn the basics of notation and tabs to play songs and grow your musical knowledge.
Practise regularly and take care of your guitar: Short, consistent practice sessions and proper care keep your instrument in shape and help you improve.
More of a visual learner? Here's the video to learn guitar!
This step-by-step video will guide you through the basics of playing guitar – perfect for beginners! Note: Make sure to switch the audio track to English to follow along.
to view this content.
Step 1: Learning Methods – How Can You Learn to Play Guitar?
There are many ways to learn guitar – and each has its advantages. Whether you’re self-taught, take lessons or follow an online course depends on your personal learning style and goals. Here are the most common methods:
Self-learning with free resources
Many guitarists start by teaching themselves. With the right materials – from YouTube tutorials to guitar learning apps – you can pick up the basics and learn your first songs. This method is flexible and low-cost, but requires a lot of discipline and self-motivation.
Guitar Lessons at a Music School with a Teacher
If you prefer structured guidance, lessons with a teacher are a great choice. A teacher can give you direct feedback, correct mistakes, and help improve your technique. However, this method is often more expensive and time-bound, as you'll need to stick to scheduled appointments.
Online guitar courses
Learning online is becoming increasingly popular, as it allows you to learn at your own pace and on your own schedule. You get access to videos, lessons, and exercises you can repeat as often as you like, whenever you like and wherever you like. It often costs less than private lessons while still offering structured learning – ideal for people with limited time.
Learn guitar with music2me!
Do you dream of playing your favourite songs around the campfire or rocking out to the riffs of your heroes? With music2me, you can learn guitar at your own pace – step by step with a system that truly helps you progress, whether you’re a beginner or already advanced.
Over 400 video lessons & downloadable sheet music
Interactive tools like Skill Check & smart practice mode
Weekly live classes & personal teacher support
Exclusive Discord community for motivation & exchange
Many guitarists combine several approaches to improve their skills. For example, you might start learning basic chords on your own, then take an online course to deepen your understanding and techniques.
Step 2: Buying a Guitar & Accessories – What Should You Consider?
To start playing guitar, you obviously need a guitar. The first decision you’ll make: acoustic or electric guitar? If you're planning to stick with it long-term, it's worth investing a little more. But how do you choose the right one?
Buying a guitar can be overwhelming for beginners. There are so many guitar types and models that it can be hard to decide. So, which guitar is best for you?
Difference Between Acoustic and Electric Guitar
The main difference between an acoustic and electric Guitar lies in the sound and amplification. Let’s take a closer look at the features of both types:
Feature
Acoustic Guitar
Electric Guitar
Body
Hollow
Solid
Strings
Nylon (classical), steel (western)
Steel
Sound
Warm (classical), metallic (western)
Clear to distorted
Sound Production
String vibration and sound hole
Pickups and amplifier
Sound in Band
Can get lost among other instruments
Versatile and easily audible in a band
Cost (beginner)
£90–£180 (€100–€200)
£180–£270 (€200–€300)
Genres
Classical, pop, folk, campfire music
Rock, pop, metal, jazz, blues
Acoustic Guitar
The acoustic guitar naturally produces sound directly through the vibration of the strings and the resonance of the body. It doesn’t use electronic amplification, so it's quieter and can get lost in a band setting, when not using a microphone setup.
There are two common types:
Classical guitar: Wide neck and backwards-facing tuning pegs. The nylon strings are softer and easier on beginners’ fingers. Commonly used in classical and some pop music.
Western guitar: Uses steel strings, giving it a brighter and more powerful sound. The narrower neck makes fretting easier. Popular in pop, rock, and folk music.
Electric Guitar
Unlike the acoustic guitar, the electric guitar has a solid body with no sound hole. The string vibrations are converted into electrical signals by pickups and made audible through an amplifier. The sound can be greatly modified and enhanced with effects like distortion, reverb, or chorus.
Key features of electric guitars:
Thinner strings, making them easier to play
Narrower neck for faster solos and complex chords
Very versatile in genres like rock, metal, jazz, blues, and pop
The price of an acoustic guitar typically starts around €100 and can go up to about €200. For an electric guitar, you’ll usually need to invest a bit more – beginner models generally range from €200 to €300.
For getting started, we recommend entry-level guitars from well-known brands like Fender (Squier), Yamaha, Ibanez, Ortega, Harley Benton, or Epiphone. These offer great value for money and are ideal for beginners. You can find more tips and comparisons in our post on "Best Guitars for Beginners".
Important: Expensive doesn't always mean better. While higher-priced guitars often use better materials and offer more precise craftsmanship, which can lead to a richer sound, a well-made beginner model is more than enough to get started.
If you’re confident that guitar is the instrument you want to stick with, it’s worth investing a bit more from the beginning. Another smart option: buying a used guitar from a trusted brand – this way, you can get high quality at a lower cost.
Guitar sizes: How big is the right size?
The right guitar size doesn’t depend on your age, but primarily on your body height and arm length. Choosing the correct size can make a big difference in how comfortable and enjoyable your playing experience is.
The key factor is the so-called scale length – the distance between the bridge and the nut of the guitar. This length determines both string spacing and tone, and it’s especially important if you have smaller hands or shorter arms. In our guide, we show you how to find the right guitar size for you. Here are a few basic points from it to get you started:
Classical Guitar (Nylon-String): Classical guitars are available in several different sizes. If you're a child or have smaller hands, you might feel more comfortable with a ½, ¾, or ⅞ size guitar. The standard full-size classical guitar is 4/4. Choose a smaller size if a full-size guitar feels too bulky or if you're struggling to reach the strings comfortably.
Steel-String Acoustic Guitar (Western Guitar): Western guitars are generally slightly larger than classical guitars, and usually come in standard sizes. However, smaller models are also available, which are great for beginners or younger players.
Electric Guitar: Electric guitars also come in various shapes and sizes. Most models are built in a standard size, but more compact versions are available and especially useful for people with smaller hands, making them easier to play.
Essential Guitar Accessories: What You Really Need to Get Started
To play and care for your guitar properly, you’ll need the right accessories. Some are absolutely essential, while others are optional but can significantly enhance your playing experience. Here's a list of the most important gear for beginners:
Guitar Strings: Which Ones Match Your Instrument?
Without strings, there’s no sound – simple as that. But not all strings are the same. String tension varies, and steel strings generally have more tension than nylon strings. Choosing the right strings depends on the type of guitar you're playing:
Classical guitars: Use nylon strings or nylon strings with a metal core
Tip: Never, ever put steel strings on a guitar built for nylon strings! You risk not only damaging the instrument, but also injuring yourself in the process.
String gauge describes the thickness of the strings, and it directly influences your guitar’s tone. Thicker strings provide a richer, warmer, and more powerful sound, but they’re also more difficult to press down and pluck. Thinner strings are easier for beginners to play, but don’t offer quite the same fullness of tone.
For electric guitars, the standard string gauge is usually .009 - .042 inches. For steel-string acoustic guitars, it’s commonly .012 - .053 inches. For classical guitars, string tension is typically labeled as light, medium, or high tension, instead of precise measurements.
Beginner tip: Start with lighter strings (e.g., light tension) to make learning easier. Once you're more confident in your playing, you can switch to heavier strings for a fuller sound.
Tuner for Acoustic or Electric Guitar
To make sure your guitar always sounds right, you need to tune it regularly. A digital tuner makes this process quick and easy, ensuring your instrument is perfectly in tune without guessing or relying on your ear. You'll find tuners for acoustic and electric guitars available.
Guitar Stand or Wall Mount
Don’t just leave your guitar lying around – this can lead to scratches and damage. Guitar stands and wall mounts are practical tools to help you store your instrument safely. You can choose between classic floor stands or space-saving wall mounts, depending on what works best in your room
Additional accessories
Pick (plectrum): A pick is a small plastic piece, usually shaped like a rounded triangle, used to strike the strings. It helps produce a clearer, more precise sound.
Amplifier for electric guitar: If you’re playing electric guitar, you’ll need an Electric Guitar Amplifier. It receives the signal from the pickups and amplifies it through a speaker. The wattage tells you how loud it can get—up to 15 watts is usually enough for home use.
Fretboard stickers: Fretboard stickers are a useful learning tool if you struggle with note recognition at first. These colorful stickers are placed on the strings and mark the notes of each fret. The different colors help you keep track and learn the fretboard positions faster.
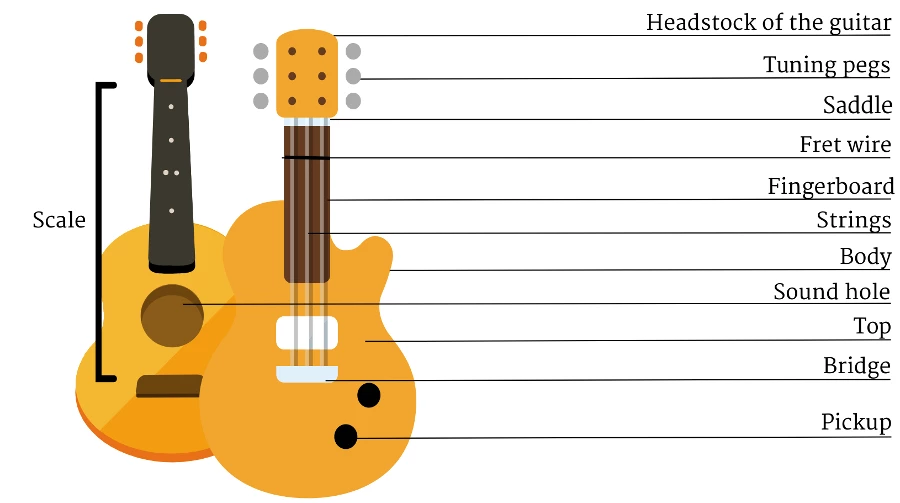
When looking at your guitar, you might wonder what all those little parts actually do. What are the knobs on the head for, and what’s the hole in the middle all about? Only by understanding the key components of your guitar will you be able to use it to its full potential and truly grasp how guitar playing works.
The construction of a guitar isn’t too complicated. It’s mainly made of wood (either solid or laminated) and metal. Solid wood delivers a better sound, as it has superior acoustic properties.
Headstock
At the head of the guitar, you’ll find the tuning pegs and the nut. The nut, which looks like a small white bar across the neck, sits beneath the strings and connects the neck to the fretboard. It makes sure the strings stay in the correct position. The tuning pegs (the little knobs on the side of the headstock) are attached to the guitar strings and allow you to tighten or loosen them in order to tune your guitar.
Neck
The neck consists of the fretboard and the frets. The frets are thin metal strips that run across the fretboard and indicate half-step intervals. Each fret raises or lowers the pitch by one semitone. When you press down a string, you shorten the vibrating length between the frets, which changes the pitch and allows you to play different notes and chords.
Guitar Strings
On acoustic guitars, the strings are tied to the bridge with knots, while electric guitars use ball ends (small metal balls), and steel-string acoustic guitars use bridge pins (small pegs) to hold the strings in place. The strings vibrate against the top of the guitar, which produces sound. The distance between the strings and the frets, called the action, affects how easy or hard it is to play. Lower action makes the guitar easier to play but can also cause unwanted string buzzing.
Sound Hole or Pickups
That mysterious hole in the center of your guitar is the sound hole. It amplifies the vibrations of the strings and makes the sound louder. Only acoustic guitars have sound holes, and they come in various shapes. In contrast, electric guitars use magnetic pickups that convert the string vibrations into electrical signals. These signals are then sent through an amplifier, producing the final sound.
Body of the Guitar
The body of an acoustic guitar is made up of the back, bridge, soundboard (top), and sound hole. The hollow wooden body helps amplify the string vibrations and projects the sound outward, making the instrument louder. The strings are anchored at the bridge.
Playing guitar is only truly fun when you position both your guitar and your hands correctly. It’s not enough to just use one hand for strumming (strumming hand) and the other for fretting (fretting hand). To play comfortably and effectively, it’s essential to position your whole body, your fingers, and your guitar properly.
How to Hold Your Guitar the Right Way:
Sit up straight.
Rest the back of the guitar against your chest and stomach.
The body of the guitar should rest on your right thigh.
Make sure the thickest string is on top, and the thinnest is on the bottom.
Your left hand (fretting hand) holds the neck of the guitar and presses the notes.
Your right hand (strumming hand) hovers above the sound hole and strums the strings.
Keep your fretting fingers close to the frets to avoid buzzing notes.
Strum the strings lightly between the sound hole and the bridge.
Use your wrist for movement – your elbow should hardly move.
Press the string with the tip of your finger firmly enough so that it vibrates only between your finger and the bridge.
In addition to the seated position, you can also play your guitar standing up or in the Western position – how to do it and how to avoid common mistakes is explained in our magazine article on the correct way to hold a guitar.
Strumming the Guitar Strings with the Right Technique
You can also use a pick (plectrum) to strum the strings – You can also strum the guitar strings with a pick – but did you know that there are different techniques for creating the perfect sound using various strumming patterns on the guitar?
Two of the most popular methods are fingerpicking and flatpicking. Both offer unique tonal possibilities and allow you to adapt your playing style.
Fingerpicking
WithFingerpicking (also called fingerstyle), you pluck the strings using the fingers of your strumming hand, without using a pick or any other tools. You use your fingertips or fingernails, typically relying on your thumb, index, middle, and ring fingers. The movement should come from the base joint of each finger, pulling toward your palm. Keep your fingers slightly curved. Your thumb should remain straight.
Advantage: Since you alternate between fingers, you can play faster and more complex patterns. It’s also easier to pluck different string pairs simultaneously than it is with a pick.
Disadvantage: Fingerpicking usually produces a quieter sound than flatpicking.
Flatpicking
In flatpicking, you use a plectrum along with your fingers. Typically, when playing with a pick, the middle, ring, and pinky fingers aren’t involved. But in flatpicking, you include them in the technique. The pick is held between the thumb and index finger, so the middle finger takes over the index finger’s role, and the ring finger takes over the middle finger’s role.
Advantage: Flatpicking makes it easy to switch quickly between rhythm and lead playing.
Disadvantage: You’ll need to adjust your finger roles, since your index finger is occupied holding the pick.
Step 5: Learn to Read Notes and Tablature
Enough theory – now it’s time to really get started and play some songs. To do that, you need to learn how to recognize the tones and find them on your guitar. There are two common ways to learn how to play the guitar: using standard notation or tablature. The best approach is to use both, so you can play a wider variety of music.
The Notation System
Let’s start with standard notation. Unlike tablature, sheet music doesn’t just tell you which strings to play, but also how long you should hold each note. And let’s be honest: sooner or later, learning to read music will become unavoidable. The notation system consists of five lines where the notes are written.
Clefs & Time Signatures
At the beginning of the staff, you'll find the so-called clef – for guitar, you’ll use the treble clef (also called the G clef). Right next to it is the time signature, which tells you how many beats are in a measure. For example, 4/4 means four beats per measure. Within each measure, there can be various note values that add up to the total length of the measure.
The Natural Notes
The most important notes you should remember are the natural notes: C, D, E, F, G, A, B. On the guitar, the open strings correspond to the following tones (from bottom to top): E – A – D – G – B – e. A handy memonic for the string names is: Eddie Ate Dynamite, Good Bye Eddie – E, A, D, G, B, e), where the first E is the low E, and the lowercase e is the high E.
The Notes on the Guitar
Each fret on the guitar raises the pitch of the string by a half step. You can memorize all the notes up to the 12th fret. Don’t panic – many of the frets are enharmonic, meaning they represent two names for the same pitch (like G♯/A♭).
Natural Notes
C, D, E, F, G, A, B
Sharpened Notes
C♯, D♯, E♯, F♯, G♯, A♯, B♯
Flattened Notes
C♭, D♭, E♭, F♭, G♭, A♭, B♭
The order of these notes follows the chromatic scale: C, C♯/D♭, D, D♯/E♭, E, F, F♯/G♭, G, G♯/A♭, A, A♯/B♭, B
Accidentals and Key Signatures
What’s the deal with sharps and flats? These accidentals change the pitch of a note either temporarily or for the entire piece if placed at the beginning of the staff. They can be cancelled by a natural sign (♮).
A sharp sign (♯) raises a note by a half step. Example: C becomes C♯.
A flat sign (♭) lowers a note by a half step. Example: C becomes C♭.
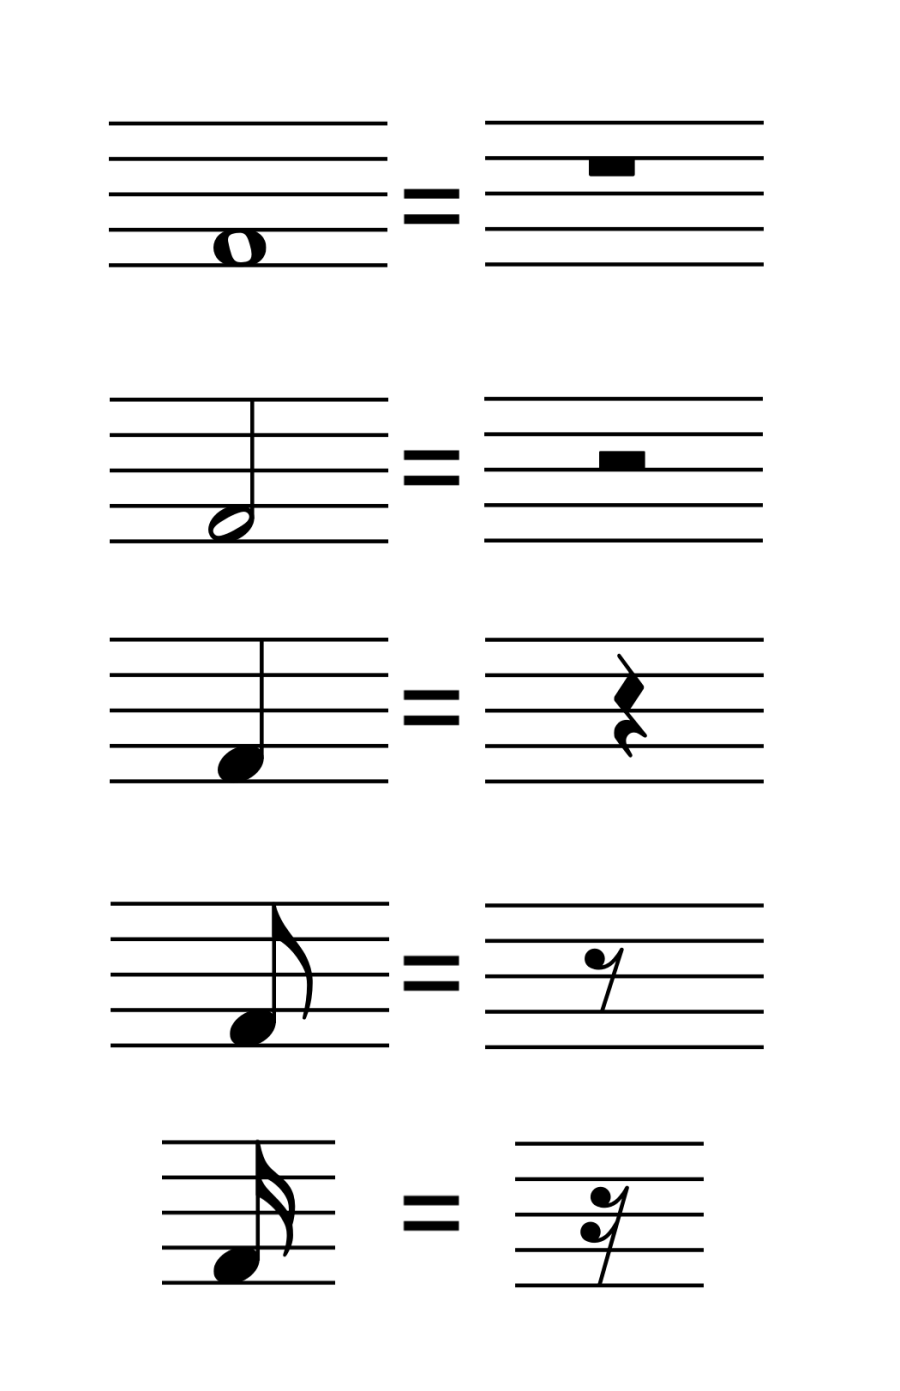
Note Values and Rests
Now that you know which tones exist on the guitar and on the page, the question is: how long do you need to hold each note?
That’s determined by the note values. Depending on whether a note is “filled in” or has a flag, it’s played for a longer or shorter duration.
When you see rests, you obviously do not play during those moments. The duration of a rest is shown with a symbol that corresponds to a specific note value:
Whole note: 4 beats
Half note: 2 beats
Quarter note: 1 beat
Eighth note: ½ beat
Sixteenth note: ¼ beat
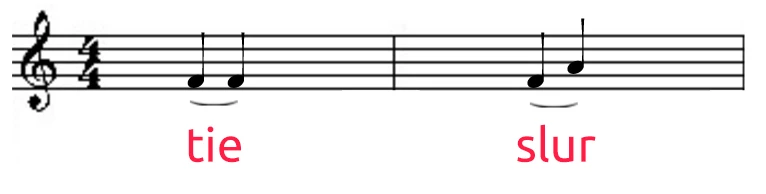
Ties and Slurs
There are also ties and slurs that help you play notes more fluidly or extend their length.
Tie: A tie tells you to connect two notes of the same pitch, so they’re played as one sustained note. For example, two tied quarter notes are held for two beats.
Slur: A slur connects two notes of different pitch, and they are played without separation in one smooth motion.
And that’s it for standard notation! Not so scary after all, right?
How to Read Tablature
Tablature is a practical system that shows you exactly where to place your fingers on the strings, without needing to read music. A tab consists of six horizontal lines that represent the six strings of your guitar.
The numbers on the lines tell you which fret to press.
A 0 means you play the string open (without pressing a fret).
An X means you should not play that string.
Tabs are a great way to learn songs without reading sheet music. The notes are played from left to right. When it comes to chords, you’ll recognize them in a tab when multiple numbers are stacked vertically. You can find everything else you need to know about reading tabs in our dedicated article on the topic.
Step 6: Learn to Play Different Guitar Chords
With just a few chords, you can already play a wide variety of songs. To make your start easier, we’ve compiled the most important guitar chords for you.
A chord consists of at least three notes that sound harmonious together. Maybe you’ve already heard of the CAGED system, which refers to the five basic chords (C-A-G-E-D). . In general, we distinguish between open chords and barre chords.
Open Chords: The Perfect Starting Point
As a beginner, open chords make it easier for you to start playing guitar. These are easier to play and form the foundation for many songs. They are quick to learn, although switching between the chords may take some practice at first. The best part: Once you master the following chords, you’ll be able to play many pop and rock songs.
Tip: Take your time and be deliberate when switching between chords. Pay close attention to which strings you play.
Here’s an overview of the open chor
C Major E don´t play A (3rd fret, ring finger) D (2nd fret, middle finger) G play open B (1st fret, index finger) E play open
A Major E don´t play A play open D (2nd fret, index finger) G (2nd fret, middle finger) B (2nd fret, ring finger) E play open
C Major E don´t play A (3rd fret, ring finger) D (2nd fret, middle finger) G play open B (1st fret, index finger) E play open
D Minor E don´t play A don´t play D play open G (2nd fret, middle finger) B (3rd fret, ring finger) E (1st fret, index finger)
E Major E play open A (2nd fret, middle finger) D (2nd fret, ring finger) G (1st fret, index finger) B play open E play open
E Minor E play open A (2nd fret, middle finger) D (2nd fret, ring finger) G play open B play open E play open
G Major E (3rd fret, middle finger) A (2nd fret, index finger) D play open G play open B (3rd fret, ring finger E (3rd fret, pinky finger)
A Minor E don’t play A play open D (2nd fret, middle finger) G (2nd fret, ring finger) B (1st fret, index finger) E play open
Barre Chords: Your Next Step
Barre chords expand your repertoire and allow you to play songs in all keys. In barre chords, you press down several or all strings at once with one finger, usually the index finger.
These chords require more strength and control, as all strings need to be pressed down evenly. Once you master the barre chords, you’ll be able to play almost any pop or rock song! Barre chords are more challenging, but with practice, you’ll quickly master them.
Tip: If you have difficulty with the strength in your fretting hand, start by practicing with less pressure to improve your technique.
Printable Guitar Chord Cheat Sheet
To make learning easier, we’ve created a cheat sheet of the most common guitar chords, which includes both open chords and barre chords. You can download it, print it, and keep it handy while practicing.
Scales are an important foundation for guitar playing and make it easier for you to learn new songs. There are two main types: Major scales (cheerful, clear, and bright) and Minor scales (dark and sad). Each scale consists of eight notes (seven different notes) that are played in a specific sequence.
The starting point of every scale is the so-called root note (e.g., C in the C major scale or A in the A minor scale). Let’s first look at the major scale:
C Major Scale
The C major scale follows these notes: C – D – E – F – G – A – B – C. Every major scale follows these intervals: 1 – 1 – ½ – 1 – 1 – 1 – ½.
This means: From C, you go a whole step (two frets) to D. From D, you go another whole step (two frets) to E, and so on, until you return to C.
How to Play the C Major Scale on the Guitar
C: Ring finger, 3rd fret of the A string
D: Play D string open
E: Middle finger, 2nd fret of the D string
F: Ring finger, 3rd fret of the D string
G: Play G string open
A: Ring finger, 2nd fret of the G string
B: Play B string open
C: Index finger, 1st fret of the B string
A Minor Scale
Minor scales come in three varieties: natural, harmonic, and melodic. The differences lie in the intervals between the notes.
Scale Type
Natural
Harmonic
Melodic
Intervals
1 – ½ – 1 – 1 – ½ – 1 – 1
1 – ½ – 1 – 1 – ½ – 1½ – ½
1 – ½ – 1 – 1 – 1 – 1 – ½
Example: A Minor
A B C D E F G A
A B C D E F G♯ A
A B C D E F♯ G♯ A
Key Signatures for Scales
Depending on the scale, certain notes may be altered to produce the correct mood. These alterations are indicated with accidentals:
Key Signature
Major
Minor
Flats (♭)
F, B♭, E♭, A♭, D♭, G♭
A♭, E♭, B♭, F, C, G, D
Sharps (#)
G, D, A, E, B, F#, C#
E, B, F#, C#, G#, D#, A#
Step 8: Practice Makes Perfect
To become a true guitar pro, regular practice is key. It's better to practice 15 minutes every day than 3 hours once a week. Playing guitar can be painful at first, but it gets easier over time. Here are a few helpful tips to improve your practice routine and become better:
Practice regularly and briefly: Instead of long sessions, practice 15–30 minutes daily. This keeps your brain focused and helps you improve faster.
Clean sound: Make sure to place your fingers close to the frets to produce clear tones.
Choose light strings and low action: Lighter strings and lower action require less finger strength to press down.
Start simple: Begin with easy chords and songs. These basics are important before tackling more complex pieces.
Take care of your fingers: Warm up your fingers, do stretching exercises, and keep your nails short to improve grip.
Stay flexible: Learn to play chords in different ways to switch between them more easily.
Do dry runs: Practice without your guitar, for example while waiting. This helps your finger memory.
Learn at your own pace: Use online lessons that loop difficult parts. Practice them until you’ve mastered them.
Step 9: Learn Special Guitar Techniques
To play like a pro, it’s worth learning from the best. Watch talented guitarists around you, go to concerts, or check out YouTube videos by legends like George Benson, Jimi Hendrix, and Eric Clapton. Observe how they play – what can you adopt from them?
Their guitar solos, in particular, offer a great way to combine expression and technique. If you want to learn how to play a solo, check out our article on the topic – it features solo examples that are perfect for practicing.
Important: Focus on precise playing first! Concentrated practice leads to faster success.
Practice slowly and pay attention to these three points:
Hold the guitar correctly and watch your finger positioning.
Press the strings firmly enough to produce clear tones.
Focus on rhythm and play with consistent volume, unless the song calls for variation.
Pros master special techniques and tones that give their sound a unique character. Here are four must-learn techniques:
Harmonics (Flageolet Tones)
Play harmonics by lightly touching the string above a fret with your fretting hand without pressing it down. Pluck the string and then lift your finger to let the tone ring out.
Tip: The higher the harmonic, the harder it is to make it sound right.
Palm Mute
The Palm Mute technique is all in the name: "Palm" (hand) + "Mute" (dampen). Use the side of your strumming hand to rest near the bridge and mute the strings. Pluck or strum while adjusting the hand position until the sound is neither too short nor too clear. Switching often between palm mute and normal playing adds excitement – used in many rock riffs.
Vibrato
Use vibrato to make sustained notes sound more expressive. On an acoustic guitar, use it subtly: move your fretting finger up and down while holding the note. This is easier on nylon strings. Electric guitars with a vibrato bar make this technique even easier.
Tip: Don’t overdo it – too much vibrato can sound unpleasant. Follow the beat!
Hammer-On and Pull-Off
These techniques increase your playing speed and create a smoother, more fluid sound.
Hammer-On: With a hammer-on, you play a note by picking it as usual, but the next note (on the same string) is not picked – instead, it's produced by “hammering on” the next finger onto the fretboard. This eliminates the sharp and defined sound of the pick attack, resulting in a more connected and softer tone. The hammered-on note should still sound clearly! In the beginning, just practice this transition from the first finger to the hammer-on.
Pull-Off: A pull-off is essentially the reverse of a hammer-on: fret two notes on the same string, pick the string, then "pull off" the finger that's playing the higher note by slightly flicking it downward across the string. This produces the second note without picking the string again. Tip: Practice the motion slowly until both tones sound clean and clear.
Step 10: Love Your Guitar – and Take Care of It
To get the most out of your guitar, one thing is crucial: love your instrument. It’s your companion on this journey, and proper care ensures it always sounds its best. Regular tuning and timely string changes are essential, but cleaning and storage are just as important.
Cleaning and Maintenance
After each session, use a microfiber cloth to wipe down strings and body. Regularly cleaning your guitar plays a major role in preserving its value and ensuring long-lasting playing enjoyment. After each playing session, it's recommended to wipe down the strings and body with a microfiber cloth to remove sweat and dirt.
Tuning Your Guitar
A guitar that is not properly tuned doesn’t just sound bad, it also makes practicing and playing less motivating. Therefore, take the time to tune your guitar regularly – with a tuner, you can quickly and reliably achieve the correct tuning. Make sure to tune in a quiet room, pluck the string clearly, and turn the tuning peg carefully until the tuner shows the correct pitch.
Changing Guitar Strings
Changing strings takes finesse. You can change all strings at once for a deep clean or one at a time to maintain neck tension. Use a soft cloth or neck support during the process. Tools like string cutters and winders make the job easier.
When restringing, thread the string through the bridge, wind it properly at the headstock, tighten, and tune. Gently stretch the string by plucking around the 12th fret – this helps it stay in tune longer.
With Dedication and Effort to Becoming a Guitar Pro
Learning guitar is a rewarding journey that takes patience and focus. Whether you're mastering posture and technique, navigating scales, or learning advanced tricks – consistent practice and attention to detail will steadily improve your skills. Most importantly, stay engaged and explore techniques like harmonics, palm mute, and vibrato to add expression and dynamics to your playing.
Don’t forget: With the right technique, regular practice, and a well-maintained guitar, you’ll make progress and reach your musical goals!
Guitar Learning FAQ
When can you start learning guitar?
There’s no fixed age limit. Kids can start at 6–7 years old, as long as they show interest and have good coordination. Teens and adults can start at any age – it’s never too late to learn with patience and time.
How long does it take to learn guitar?
It depends on your goals, practice habits, and motivation. Many beginners can play simple chords and songs in a few months, while advanced techniques can take 1–2 years to master.
How long does it take until I can play songs on guitar?
This varies for each person; some learn faster, others take longer. It depends on how much time you invest and how focused your practice sessions are. Try to practice 3-4 times a week for about 20-30 minutes. After a few weeks, you’ll be able to play simple songs. More difficult songs or riffs, and even guitar solos, are more complex and will take more time to learn. A practice plan with short-term and long-term goals can help you set a structure.
Should I start with chords or melodies?
Most beginners start with chords, since they’re the foundation of many songs. Once you're comfortable, you can explore melodies and solos.
Do I need to learn music notation?
Not necessarily. Many players start with tabs, which are easier to read. Notation is useful if you want to dive into music theory or classical music.
You want to learn to play the guitar but are unsure which type of lessons suits you – and what the whole thing might cost? In this article, you'll find a comprehensive overview of the various forms of guitar lessons: from music schools and private lessons to online courses. We’ll show you what prices to expect, what factors influence the cost, and how you can learn guitar even on a tight budget.
You want to learn electric guitar and don't know exactly where to start? Don't worry – the beginning is easier than you think. In this guide, we'll show you how to master your first songs with the right equipment, a structured learning plan, and lots of fun in 5 clear and simple steps.
Whether you love rock, pop, metal, or blues, the electric guitar offers you all kinds of sound possibilities. Let’s get started!