Playing chords is going well, but somehow your playing doesn't sound quite like a real song yet? The secret lies in the rhythm! A cool strumming pattern is the heart of any good guitar accompaniment. It transforms a simple chord progression into a catchy song that gets stuck in your head and makes your feet tap.
Don't worry, it's not magic. In this guide, we'll show you step by step how to learn simple and complex guitar strumming patterns. We'll start with the absolute basics and rock our way up together to techniques that will let you accompany your favourite pop and rock songs. Are you ready to get the rhythm in your fingers and finally get properly started with learning guitar?
The Essentials of Guitar Strumming Patterns at a Glance
Basically: A strumming pattern is a repeating rhythmic sequence of upstrokes and downstrokes that you use to accompany chords. It gives every song its unique character and groove.
Important: A relaxed, even movement in your wrist is crucial. Your hand should swing like a pendulum, even if you don't touch the strings sometimes (so-called "air strums").
Tip: Start slowly and use a metronome! Clean timing is more important than speed. Many free metronome apps are available for your smartphone.
What Exactly Is a Strumming Pattern?
Imagine you have a simple chord progression, for example, G major, C major, and D major. You could just strum each chord once and let it ring. That would be correct, but also quite boring.
A strumming pattern breathes life into the time between chord changes. It's a repeating accompaniment pattern created by a combination of downstrokes and upstrokes, giving the song its typical rhythm. Whether it's a gentle folk ballad, an upbeat pop song, or a driving rock track – the right strumming makes all the difference. Learning how to strum a guitar properly is key.
Learn guitar with music2me!
Do you dream of playing your favourite songs around the campfire or rocking out to the riffs of your heroes? With music2me, you can learn guitar at your own pace – step by step with a system that truly helps you progress, whether you’re a beginner or already advanced.
Over 400 video lessons & downloadable sheet music
Interactive tools like Skill Check & smart practice mode
Weekly live classes & personal teacher support
Exclusive Discord community for motivation & exchange
The Basics: How to Read and Understand Strumming Patterns
To learn and write down strumming patterns, we need a common language. Don't worry, you don't have to become a sheet music pro. A few simple symbols and musical notations are enough.
The rhythm for a strumming pattern is represented in notes. Here, only the duration of a note is important, not its pitch. The most important detail for us is the time signature, usually written as a fraction (e.g., 4/4) at the beginning of the stave.
A 4/4 time signature, which is the most common in pop and rock music, means: Four beats fit into each bar, each with the value of a quarter note (crotchet). So, you count "1, 2, 3, 4", and then the next bar begins.
If you want to dive deeper into the world of reading sheet music, take a look at our dedicated article on reading guitar sheet music.
An important tool for controlling the tempo of your strokes is a metronome, which gives you the tempo via a clicking sound. The tempo is measured in beats per minute (bpm). A tempo of 60 bpm equals one beat per second.
Tip: Anyone working on rhythm should definitely use a metronome; they are also widely available as free apps.
Downstroke vs. Upstroke: The Symbols
Every note in our strumming pattern stands for a stroke. To show the direction, we use two simple symbols:
Downstroke: A symbol that looks like a small square missing its bottom line (⊓). You strum with the plectrum from the low to the high strings (from top to bottom).
Upstroke: A V-shaped symbol (∨). You strum from the high to the low strings (from bottom to top).
Your First Strumming Pattern with Eighth Notes
Only using downstrokes quickly gets monotonous. Let's bring more movement into play! For this, we use eighth notes (quavers). An eighth note is exactly half as long as a quarter note. So, eight eighth notes fit into a 4/4 bar. We count them like this: "1 and 2 and 3 and 4 and". You play:
On the beats (1, 2, 3, 4), play a downstroke.
On the "and" in between, play an upstroke.
This continuous down-up movement is called alternate strumming. It is the absolute foundation for almost all fluid strumming patterns! Your hand should swing up and down loosely in time.
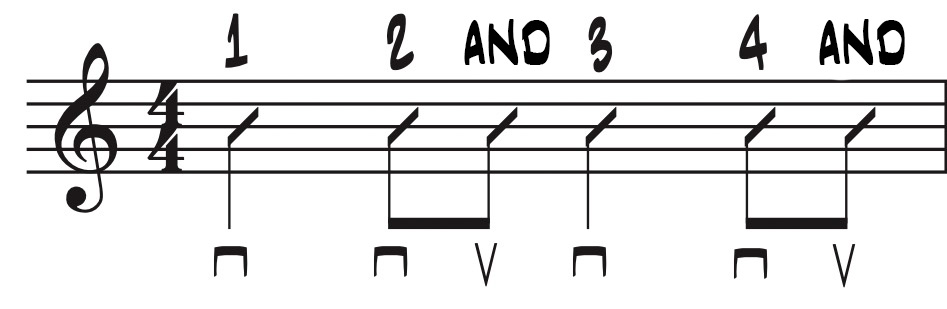
The Universal Strumming Pattern for Pop & Rock
With alternate strumming, we can now build one of the most famous strumming patterns. It fits countless songs! It looks like this:
Important: Make sure to follow the instructions for downstrokes and upstrokes exactly, as shown here. Your hand should move evenly up and down. Sometimes you'll strum "into thin air" (an air strum) to stay in time.
With the following two strumming patterns, you can accompany almost all common rock and pop songs. You could also combine both patterns to create a two-bar strumming pattern – feel free to experiment!
Other Time Signatures for Strumming Patterns
While the 4/4 time signature dominates the world of rock and pop, there are, of course, other time signatures that give songs a completely different character.
Time Signature
Strumming Patterns with Quarter Notes
Strumming Patterns with Eighth Notes
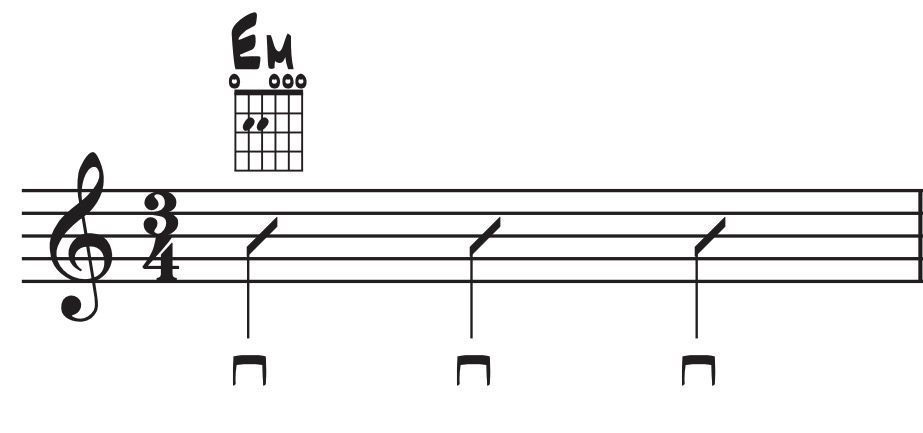
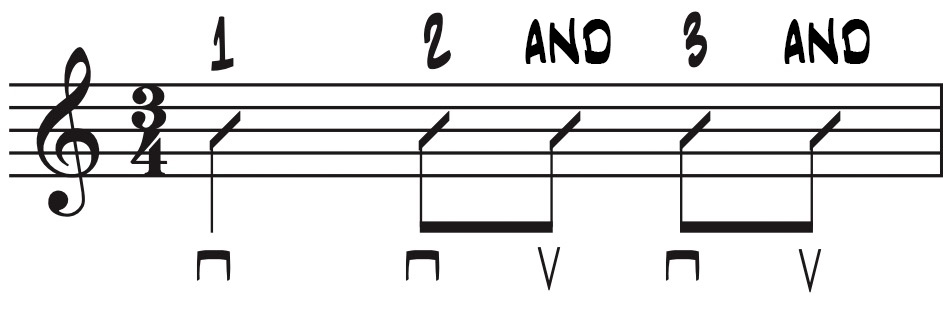
3/4 Time
Known as the "waltz time". Here, you only count to 3 ("1, 2, 3").
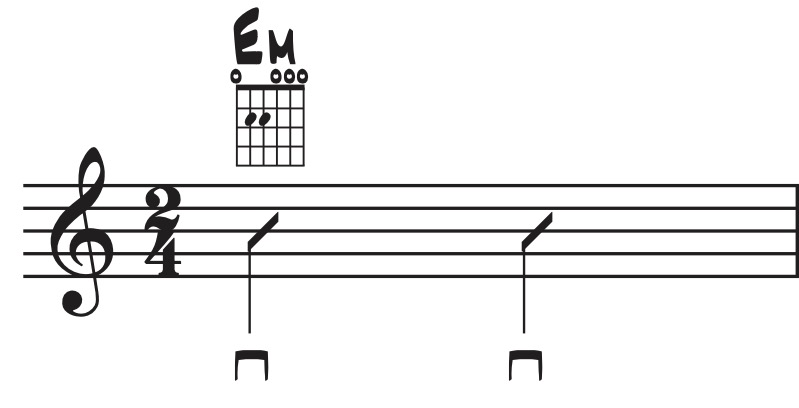
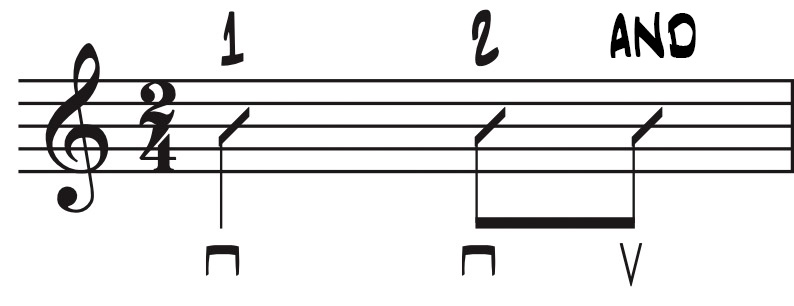
2/4 Time
A short, often march-like time signature. You only count to 2 ("1, 2").
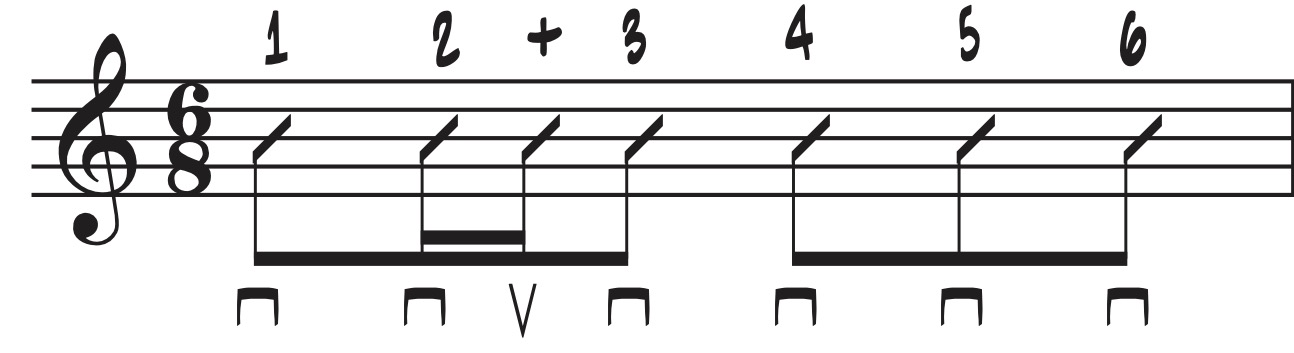
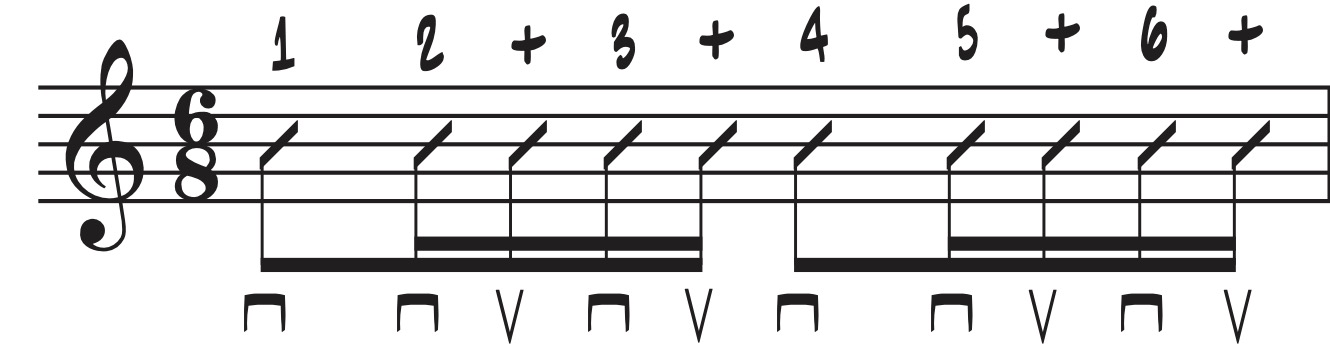
6/8 Time
This time signature is often used for ballads or folk songs. It has a triplet-like, swaying feel. It is counted in two groups of three ("1 2 3 4 5 6").
The Most Important Techniques for Rock Guitar
Want to make some serious noise? Rock guitar has its own rules and techniques that provide the necessary drive. Here are the most important building blocks.
The Foundation of Rock: Power Chords Many rock and metal songs don't use full major or minor chords, but rather power chords. These are simplified chords consisting only of the root note and the fifth. They sound neutral, powerful, and don't turn to mud even with heavy distortion. A typical power chord (e.g., G5) is often played only on the three lowest strings.
The Classic Eighth-Note Drive A driving, straight eighth-note rhythm is the foundation of many rock anthems. Often, only downstrokes are used here to create a particularly stomping and aggressive sound.
For More Punch: Palm Muting Palm muting is perhaps the most important rhythm technique in rock. It involves resting the heel of your strumming hand very lightly on the strings, right at the bridge of the guitar. If you strum the muted strings now, it creates a percussive, short, and defined "chug" sound. It provides the necessary punch in the verses and makes open, loudly strummed chords in the chorus sound all the more massive.
Learn Over 70 Rock Songs and Riffs with music2me!
Do you dream of playing the songs of your heroes? Our "Rock Songs & Riffs" module is your ticket to the world of rock guitar. From immortal rock anthems to grunge and modern riffs – we'll show you in easy-to-understand video lessons how to really rock with techniques like bending and slides!
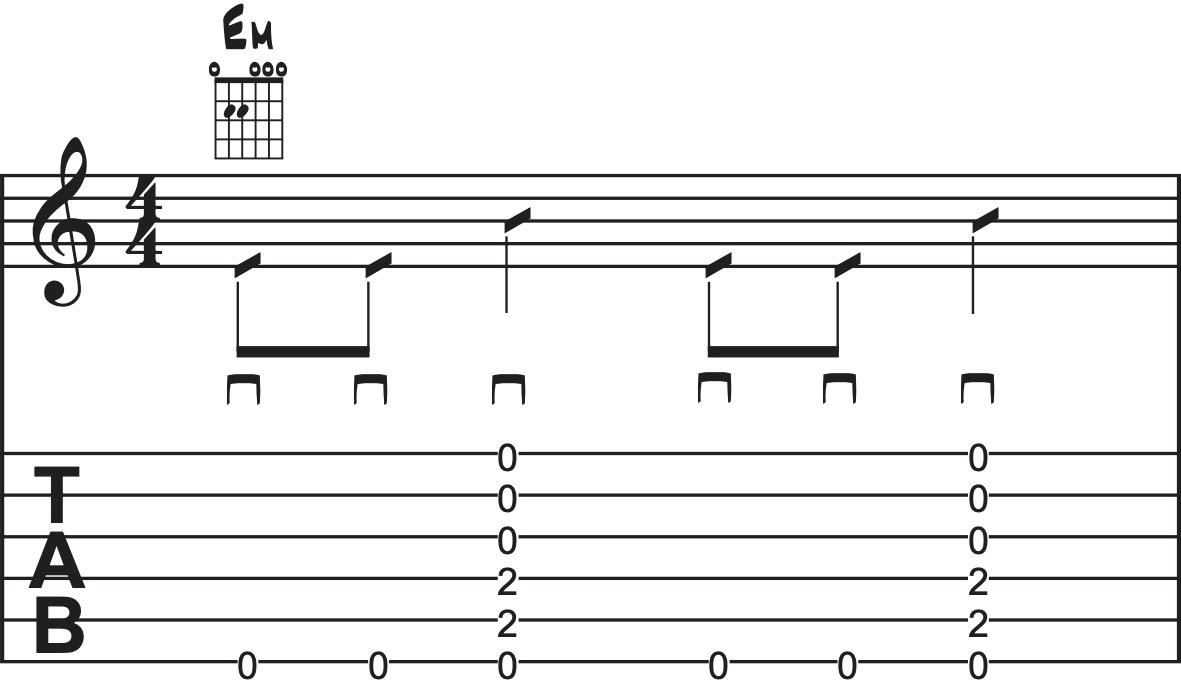
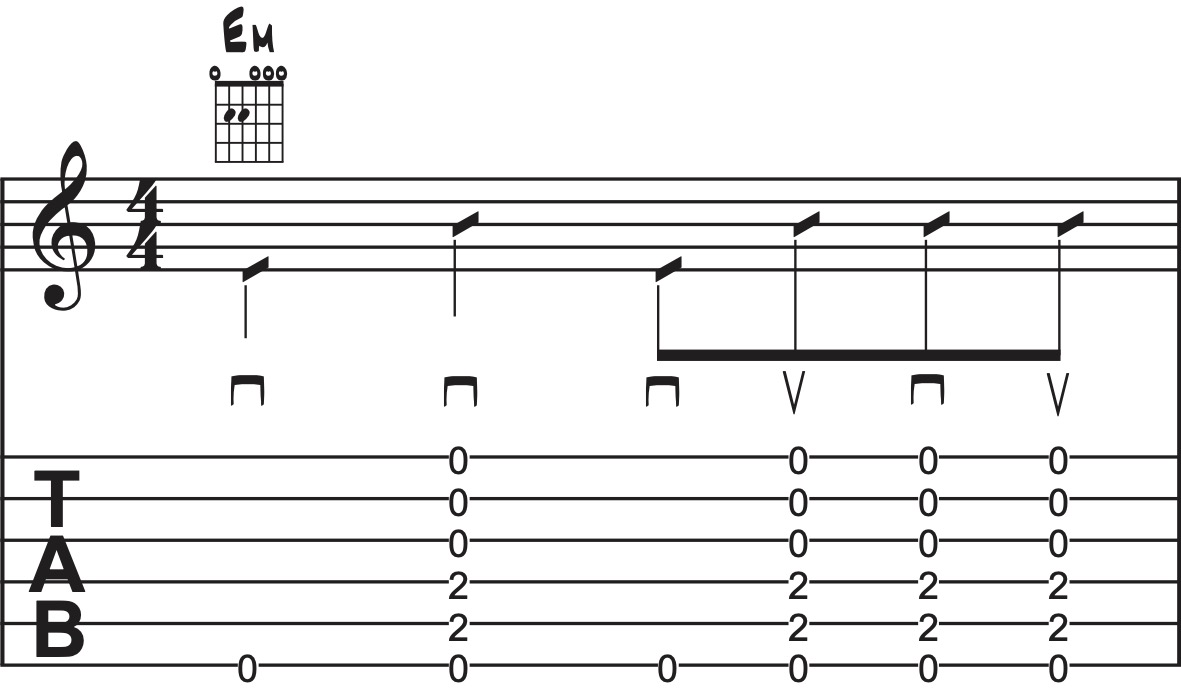
A tie connects two consecutive notes of the same pitch so that they sound like a single note. The second note attached to the first by a tie is not struck again; instead, it extends the duration of the first note. In this way, any note length can be achieved, or notes can be extended across a bar line. A tie can also be placed within a bar if it helps improve readability.
Simple Example:
The E minor chord is strummed on beats 1, 2, and 4; the stroke on beat 3 is omitted. The stroke on beat 2 thus sounds as long as two quarter notes.
Combined with an eighth-note rhythm, ties can create interesting rhythms. The next example is a popular classic for many acoustic songs:
The stroke on beat 3 is therefore omitted, and the played note on the "2 and" beat then rings out for the duration of a quarter note. As you can see, the downstroke on beat 3 is now in brackets.
Important: At this point, you should still strum downwards without touching the strings (an "air strum"). Your strumming hand should always move evenly up and down to create a fluid rhythm. Always try to maintain a continuous movement, even when the strings aren't being struck.
2. Strumming Patterns with Accents
When you dynamically highlight individual strokes, it's called an accent. Through these accents, the rhythm of the strumming pattern will automatically sound more alive. The affected note or chord is simply played louder, so just strum a bit harder here. The symbol for this is the ">" above the note. Playing accents on an upstroke might be tricky for you at first, but with a little practice, it's definitely masterable.
Here, too, there are countless variations; the following example is used in plenty of rock and pop songs. The accents fall on beats 1, "2 and", and 4.
3. Playing Dead Notes on the Guitar
This is something you'll probably only find on the guitar: dead notes – notes that aren't actually notes. This is a percussive effect that you can incorporate into your strumming pattern. This click or scratch sound occurs when you lay your hand completely across all the strings without pressing them down properly; you're just lightly muting them. If you strum now, a percussive sound is created, and no actual pitch should be audible. Dead notes are visually represented like this: The note head becomes a cross.
Here is a first simple exercise for this:
Fret a chord, let's take an E minor chord as an example, and strum it once. On the second and fourth stroke, i.e., the dead note, you mute the strings with the heel of your strumming hand, right during the downward motion of the stroke!
The tricky part here is that everything has to happen in one motion, and no string should ring out during the stroke. Only the percussive sound should be heard. Please don't change the position of your fretting hand, just keep holding the chord. You could also mute with your fretting hand, but that becomes very difficult and cumbersome later on with complex and fast rhythms. This whole thing requires some practice and patience until you get the right movement sequence down.
Played with continuous eighth notes and dead notes on beats 2 and 4, you get a standard pop strumming pattern. By using dead notes, you're now building a percussive element into your strumming pattern. Especially when played on an acoustic guitar, this sounds pretty cool!
Another strumming pattern with dead notes and a tie:
On beat 3, there is another "air strum"; make sure to keep your strumming hand moving regardless. This is a slightly more difficult strumming pattern, but it sounds extremely good!
4. Strumming Patterns with Individual Bass Notes
Another way to make your accompaniment more interesting is to play individual notes of a chord. For example, instead of strumming the full chord, you can just strike the lowest note of the chord, which is the bass note.
Here is an example with an E minor chord, this time shown in sheet music and tablature.
So on beats 1 and 3, you only strike the bass note individually, and on beats 2 and 4, you strum the full chord as usual. A fairly simple method to stop your accompaniment pattern from sounding quite so monotonous.
Combined with eighth notes, there are once again many creative possibilities. Here are two examples:
With some chords, however, the bass note is not on the low E string. Then, of course, it becomes slightly more difficult to hit the individual notes precisely. Here's an example with the following chord progression: G major – D major – Cadd9. Make sure to hit the single string as accurately as possible for the D major and Cadd9 chords.
5. Strumming Patterns with 16th Notes
For faster rhythms, you can use 16th notes (semiquavers), recognisable by their double beams. These are played twice as fast as eighth notes, and they are usually visually divided into groups of four.
In a 4/4 time signature, it would look like this:
Here, you count it like this: 1 e & a - 2 e & a - 3 e & a - 4 e & a.
Measured against the length of a quarter note, you have to strum four times in the same amount of time with 16th notes.
To get a feel for this, try the following exercise: Try to count along with your strokes. You can also tap your foot, which must always tap down on beats 1 - 2 - 3 - 4. Recommendation: Practise with a metronome, ideally at a slow tempo of 50 bpm.
The next exercise is an alternation between eighth notes and 16th notes. Perform the exercise as you did with the quarter notes previously. Important: The eighth notes are now played using only downstrokes; the alternate strumming is then used for the 16th notes.
If you now combine eighth notes and 16th notes in one bar, you get very interesting rhythms that are used in countless songs. Once again, there's a huge potential for variation; you'll find examples in the strumming pattern overview above.
Your Rhythm, Your Sound: Find Your Perfect Strumming Pattern Now
As you've seen: Rhythm on the guitar is a huge and incredibly creative playing field. The key is to learn the basics cleanly and then experiment boldly. Listen closely to your favourite songs and try to recreate the guitar's rhythm. What pattern do you hear? Is it fast, slow, driving, or gentle? The strumming patterns shown here are your toolkit. Combine them, vary them, and find your own groove. At the beginning, the most important thing is to develop a good sense of rhythm. So grab your guitar, start the metronome, and get going. Every bar you practise brings you one step closer to your goal of being able to accompany any song!
Frequently Asked Questions About Guitar Strumming Patterns
Which strumming pattern fits which song?
A good starting point is to listen to the drums. The "campfire rhythm" (Down - Down - Up - Down - Up) fits almost all pop songs in 4/4 time. For rock songs, a straight eighth-note rhythm with power chords is often a great choice.
How do I learn to stay in time with the strumming pattern?
Practise slowly and with a metronome. Start at 60 BPM (beats per minute) and only increase the tempo once you have absolutely mastered the pattern. Tapping your foot along to the beat also helps enormously.
Do I have to play with a plectrum?
For most strumming patterns, especially in rock and pop, a plectrum is ideal because it produces a clear and loud sound. However, you can also play with your fingers (thumb for downstrokes, index finger for upstrokes), which results in a softer tone.
How do I change chords at the right moment?
Practise chord changes in isolation. The trick is to use the last upstroke of the bar to already start moving your fretting hand to the next chord. That way, you have enough time and land perfectly on the "1" of the new bar.
My hand always cramps up when strumming. What can I do?
That's a typical beginner's problem. Make sure your wrist and arm posture are relaxed. The movement should be fluid and not forced. Take regular breaks and shake your hand out.
Want to learn guitar but don't know where to start? This guide walks you through the first essential steps — perfect for beginners who want to make quick progress.
You'll receive valuable insights on choosing the right guitar, proper playing and posture techniques, and how to read music and tablature. You'll also learn how to play chords, take care of your guitar, and discover the secrets of effective practice to continuously improve your playing. Let's get started!
You want to learn to play the guitar but are unsure which type of lessons suits you – and what the whole thing might cost? In this article, you'll find a comprehensive overview of the various forms of guitar lessons: from music schools and private lessons to online courses. We’ll show you what prices to expect, what factors influence the cost, and how you can learn guitar even on a tight budget.