Anyone can learn piano – all you need is the right method, a bit of patience, and a love of music. This guide will take you through the most important basics, from the keyboard layout to note values, time signatures, and your first melodies and chords. With simple exercises and practical tips, you'll quickly see progress – perfect for beginners!
The Most Important Points to Learn Piano at a Glance
Learning to play the piano is a wonderful goal – and one that’s achievable at any age. Whether through an online course, an app, at a music school, or with private lessons: there are many ways to get started. What really matters is a clear and structured approach that takes you step by step from the basics to more complex pieces.
More of a visual learner? Here's the video to learn piano!
to view this content.
Step 1: Learning Method – How Can You Learn to Play the Piano?
At first, learning the piano might feel a bit overwhelming. But it's worth it – even with no prior experience. What’s important is choosing a learning method that suits you and your lifestyle. Here’s a brief overview of the different options:
Learn Piano Independently
Many beginners learn piano on their own – using YouTube videos, piano learning apps, or free online tutorials. This method offers a great deal of freedom: you set your own pace and can practise whenever it suits you best. However, it requires a lot of self-motivation and patience, especially in the beginning when questions arise.
Piano Lessons at a Music School or with a Teacher
If you prefer personal support, one-to-one lessons with a teacher are a great option. An experienced teacher will show you the correct technique, spot mistakes, and provide individual feedback. This method is ideal for children or for anyone who needs set appointments to stay on track.
Online Piano Course
Online courses are a popular alternative, especially for adults. They offer a structured introduction to learning piano – usually including videos, exercises, and playalongs. You can watch the content at any time and repeat it as often as you like. This way, you can learn flexibly but with a clear and organised progression.
Learn piano with music2me!
Imagine sitting at the piano, your fingers gliding effortlessly across the keys as you play melodies that move your heart. With music2me, you can learn piano at your own pace – step by step with a system that truly helps you progress, whether you’re a beginner or already advanced.
Over 400 video lessons & downloadable sheet music
Interactive tools like Skill Check & smart practice mode
Weekly live classes & personal teacher support
Exclusive Discord community for motivation & exchange
No matter which path you choose, the most important thing is to stick with it and enjoy practising. Many people also combine different methods, such as online courses with occasional private lessons. Find out what keeps you motivated – that way, the joy of learning piano stays with you.
Step 2: Buying a Piano & Accessories – What Should You Consider?
To learn piano, you obviously need an instrument. But which one is right for you? A traditional acoustic piano, a modern digital piano, or is a keyboard enough?
Even if you're unsure whether playing the piano will become a long-term hobby, you should choose an instrument that suits your needs. The right choice can make a big difference. There are many options – from acoustic pianos to modern digital models. Which one suits you best depends on how much space you have, how much you want to invest, and how you prefer to learn.
The Different Types of Pianos at a Glance
Acoustic Piano
Grand Piano
Digital Piano
Keyboard
Sound & Feel
Classic, full sound
Especially dynamic and balanced
Varies by model, usually digitally produced
Less authentic, electronic
Maintenance
Tuning 1–2× per year
Regular tuning required
No tuning needed
Very low, mainly key care
Price (Beginner)
From approx. €2.000
From approx. €5.000
From approx. €400
From approx. €100
Space Required
Medium-sized, can be placed close to a wall
Very large, needs a lot of space
Compact, ideal for small spaces
Very compact, ideal for small spaces
Weight
150–250 kg
Over 250 kg
10–50 kg
Very light, usually under 10 kg
Special Features
A classic for home use
Ideal for concert and classical playing
Recording function, metronome, learning features
Many sound variations, often with learning features
Keys
88
88
88
61
Who Is It For?
Ambitious beginners & advanced players
Advanced players, professionals
Beginners, hobbyists
Beginners, children, hobbyists
If you'd like to know more about the different instruments, take a look at our article “Piano for Beginners”.
The Right Accessories for Your Piano
It’s not just the instrument itself that matters. The right piano accessories make playing more comfortable and support your practice. Here’s a quick overview of the most useful tools for beginners and more advanced players:
Piano Bench or Stool: A height-adjustable piano bench or ergonomic stool is essential for a healthy playing posture. Make sure the seat is comfortable and offers enough support. Models like the Thomann KBH-200 BKM or Thomann KBH-400 BKM provide both comfort and stability – perfect for longer practice sessions.
Sustain Pedal: A good sustain pedal ensures more precise sound control, especially with digital pianos. The included pedal is often low quality, so it's worth investing in a separate model. Recommended options include the M-Audio SP-2 or Fatar VFP1-25, both offering better control and easy connection.
Piano Cleaner & Care Products: Regular maintenance protects your piano and keeps it looking good. Use special cleaners to remove dirt and grease, combined with a microfibre cloth to prevent scratches. Products like Jahn Piano Cleanser or MusicNomad The Piano One are gentle and effective.
Piano Stickers: For beginners, piano stickers are a great aid. They help you get familiar with the keys and learn note names more easily. Stickers like the music2me Piano Stickers are easy to apply and leave no residue.
Keyboard Cover: A keyboard cover protects your keys from dust and dirt. Especially useful if there are longer breaks between practice sessions. Covers like the Keyboard Dust Cover Green help shield your instrument from external influences.
Piano Lamp: If you often play in low light, a piano lamp is essential. It provides even illumination of your sheet music without straining your eyes. Recommended models include the Jahn L4523 Swing black or the Gewa PL-78 Piano Lamp – both are easy to adjust to your instrument.
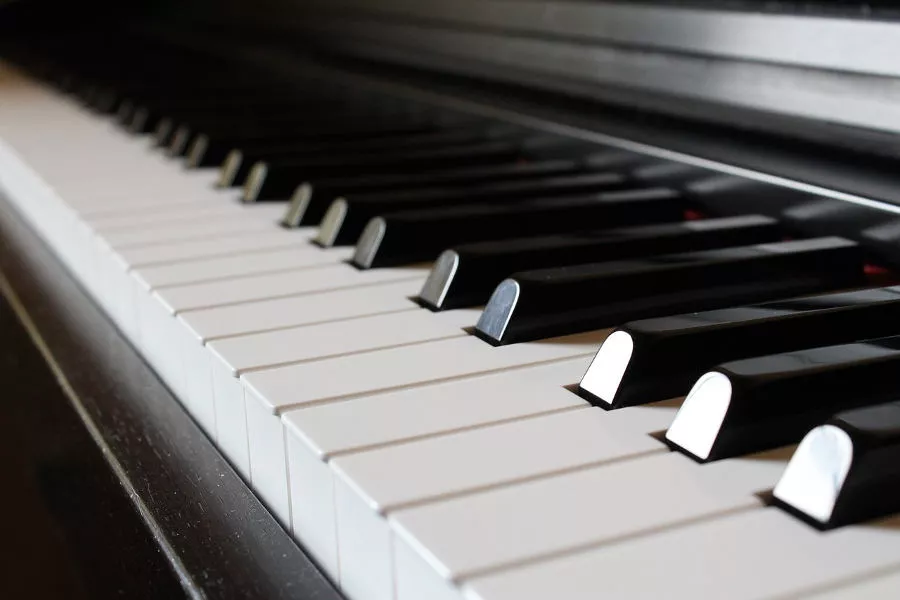
Step 3: Piano Layout – Getting to Know the Keyboard
Before you play your first notes, you should get to know your instrument well. Don’t worry – you don’t need to be a tech expert. But understanding how a piano is structured, what the individual parts do, and how to navigate the keyboard will make it easier to learn piano.
Tip: Are you using a digital piano? Take a close look at the manual. It often includes useful learning features such as a metronome, auto-accompaniment, or learning modes.
Component
Function
Keyboard
88 keys (52 white, 36 black)
Body
Piano housing – also a soundboard for acoustic pianos
Music Stand
For sheet music or a tablet
Pedals
Controls for special sound effects
Cables & Ports(digital pianos only)
For power, headphones, USB, etc..
The Keyboard – Easy Orientation
Whether it’s a piano, grand piano, digital piano, or keyboard – the good news is: all keyboards follow the same layout. Once you understand the piano keyboard, you’ll be able to find your way around any key-based instrument.
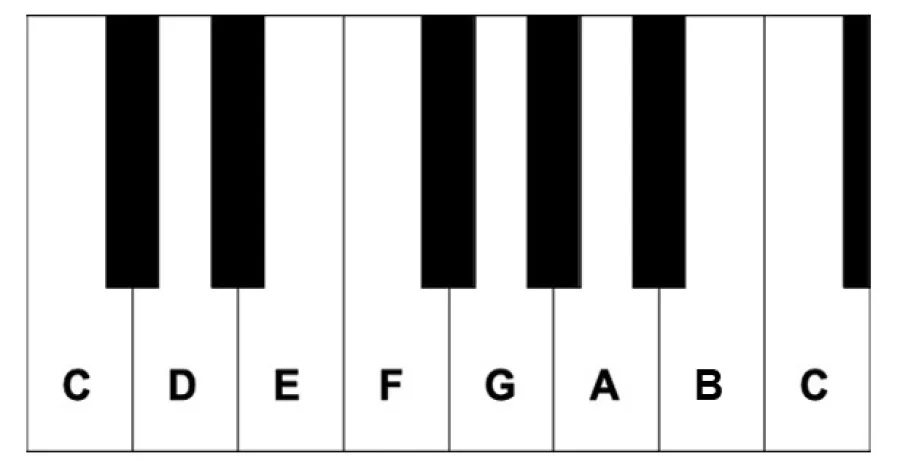
A piano has 88 keys arranged in a repeating pattern:
52 white keys: Natural notes (C, D, E, F, G, A, B)
36 black keys: Semitones (♯ and ♭)
Take a look at the black keys – they’re grouped in twos and threes. The white key directly to the left of a group of two black keys is always a C. These groupings help you quickly identify where you are on the keyboard.
Octaves: A Repeating Pattern
The keyboard is divided into groups of 12 tones – known as octaves. Each group consists of 7 white keys and 5 black keys. This pattern repeats across the entire keyboard. The best starting point is middle C: Sit at the piano so you're positioned directly in front of this key. It serves as a reference point for both playing and reading music. On many keyboard diagrams, middle C is clearly highlighted.
Exercise: Locate all the C keys on your keyboard. Once you recognise the pattern of black keys, navigating the keyboard becomes much easier.
Semitones on the Keyboard
Between many of the white keys, you'll find a black key – this represents a semitone. For example:
From C to the first black key on the right is a semitone.
From this black key to the white D key is the next semitone.
But be careful: Not all white keys have a black key between them! A good example is the space between E and F or B and C – even though there’s no black key between them, it’s still a semitone step.
Step 4: Proper Posture and Finger Position
If you want to learn piano well, you’ll need more than just fast fingers – a healthy, relaxed posture is just as important. Good posture helps you practise longer and more comfortably, prevents tension or injury, and improves your tone. Many beginners underestimate how much posture and hand positioning affect both the sound and the overall playing experience.
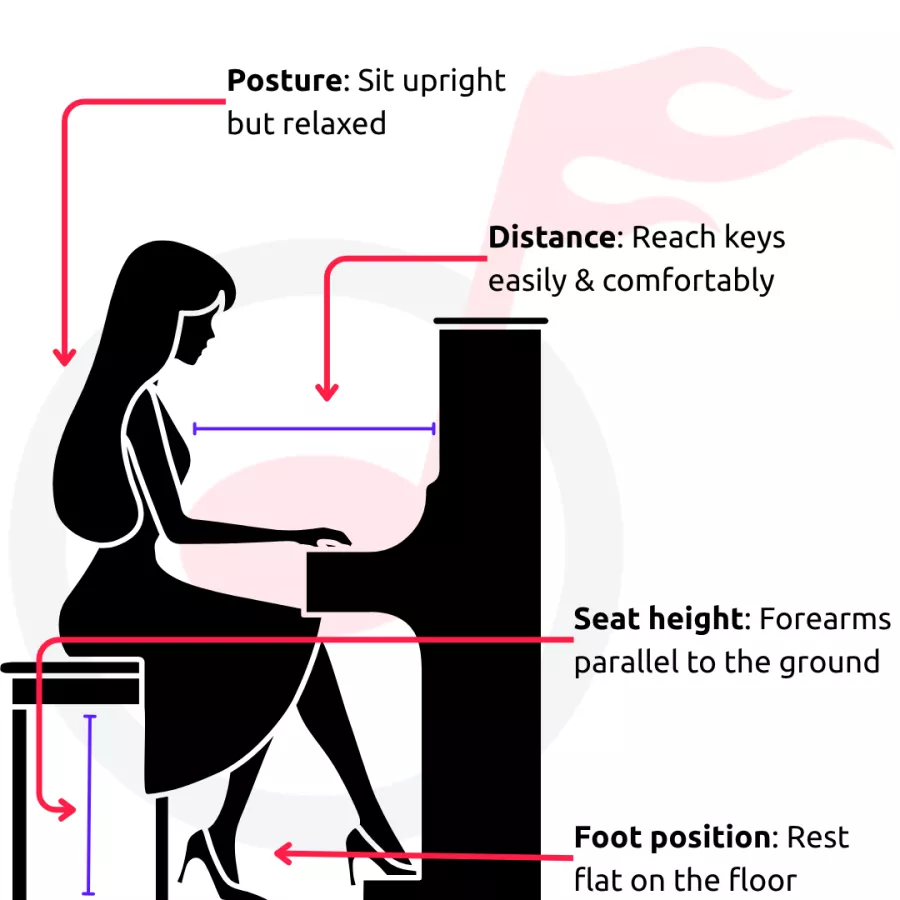
Sitting Position: How to Sit Correctly at the Piano
Posture: Sit upright but relaxed at the piano. Keep your back long and your shoulders loose. Imagine an invisible string gently pulling your head upwards – this will help you find a natural, upright posture.
Distance from the piano: Sit so that you can stretch your arms forward comfortably. You should be able to reach the keys without leaning in or raising your shoulders.
Seat height: Your forearms should be parallel to the floor when your hands are resting on the keyboard. Ideally, your elbows should be slightly above the keyboard.
Foot position: Both feet should rest flat on the floor. Make sure you feel stable and relaxed. If your feet don’t reach the floor, a small footstool can help.
Finger Position: How to Hold Your Hands Properly at the Piano
Your hands are your most important tools at the piano. They need freedom of movement and a relaxed yet stable position. A good hand position looks like this:
Fingers: Slightly curved, as if holding a small ball.
Palm: Naturally arched, without tension.
Thumb: Rests gently on the front edge of the keys, not sticking out.
Wrist: Aligned with your forearm, relaxed and mobile – neither too low nor too stiff.
Exercise: Imagine you're holding a tennis ball in your hand. That’s exactly the shape your fingers should form when playing.
Finger Numbers Explained: Which Fingers Play Which Keys?
To avoid getting your fingers “tangled” when you play the piano, there are clear rules about which finger plays which key. These are known as fingerings, and you'll often find them written in sheet music. They help you play more smoothly and confidently. The goal: You shouldn’t have to ask yourself "Which finger now?" for every single note. Instead, you should be free to focus on the sound and the music.
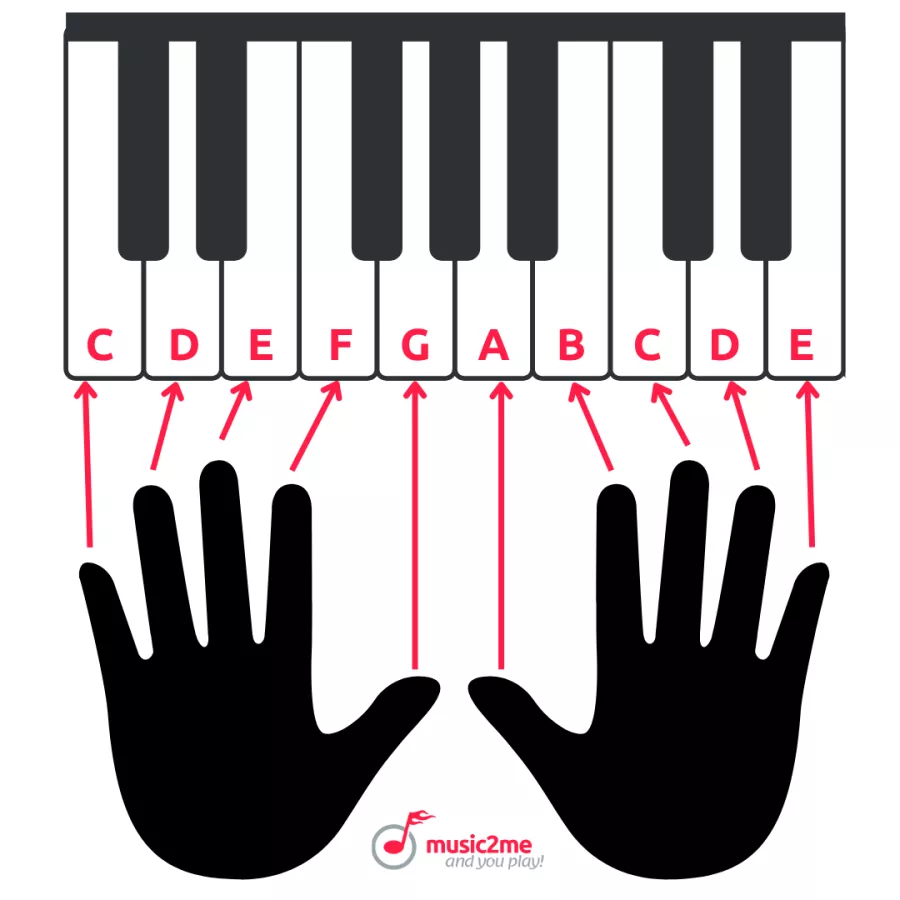
Hold your hands loosely and relaxed in front of you. Palms facing down, fingers gently spread. Each finger has a specific number:
Thumb = 1
Index finger = 2
Middle finger = 3
Ring finger = 4
Small finger/ Pinky = 5
At the beginning, it takes some practice to move your fingers individually and with control. But over time it becomes easier – and eventually, it will feel natural.
Exercise: Place each finger on a different key. Play them slowly and mindfully – not with force, but with feeling and control. Notice how the key responds gently to your touch.
Step 5: Learning to Read Music – Understanding Notes and Rhythms
Many beginners ask: Can I learn piano without reading music? The answer is – it depends. If you just want to play by ear or follow numbers, you can skip it at first. But if you truly want to understand music, work out pieces on your own or play with others, then learning to read music is essential.
Sheet music tells you which notes to play, when and how long to play them. You can think of sheet music as a map – it shows the path, the stops and the destination. Sounds complicated? Don’t worry – with a bit of practice, it becomes clear very quickly.
The Staff & Clefs – Simply Explained
The foundation of all sheet music is the staff, made up of five horizontal lines. Notes are written on and between these lines. The position of the note tells you how high or low the sound is.
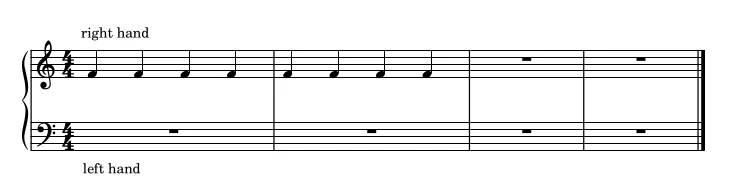
On the far left, you’ll often see a curved bracket – called a brace – which connects two staves: one for the right hand and one for the left. This is typical for instruments like the piano.
The upper staff is for the notes played with the right hand. You’ll see the treble clef here, also called the G clef, because its spiral marks the position of the G on the second line.
The lower stave is used for the notes played with the left hand. It uses the bass clef, also called the F clef, because its two dots surround the position of the note F.
The time signature appears at the beginning of both the treble clef and the bass clef. In the graphic example, a 4/4 time signature is shown for both (four over four). The top number indicates the number of beats per bar – in this case, each bar contains four beats. The bottom number shows the note value that counts as one beat. So in a 4/4 time signature, four quarter notes (crotchets) make up one bar. In other words, each bar is the length of four quarter notes.
Note Values: How long does a note last?
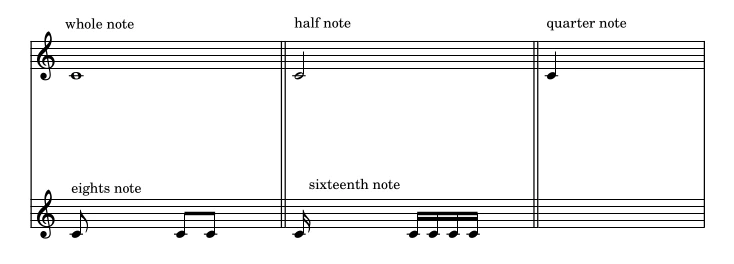
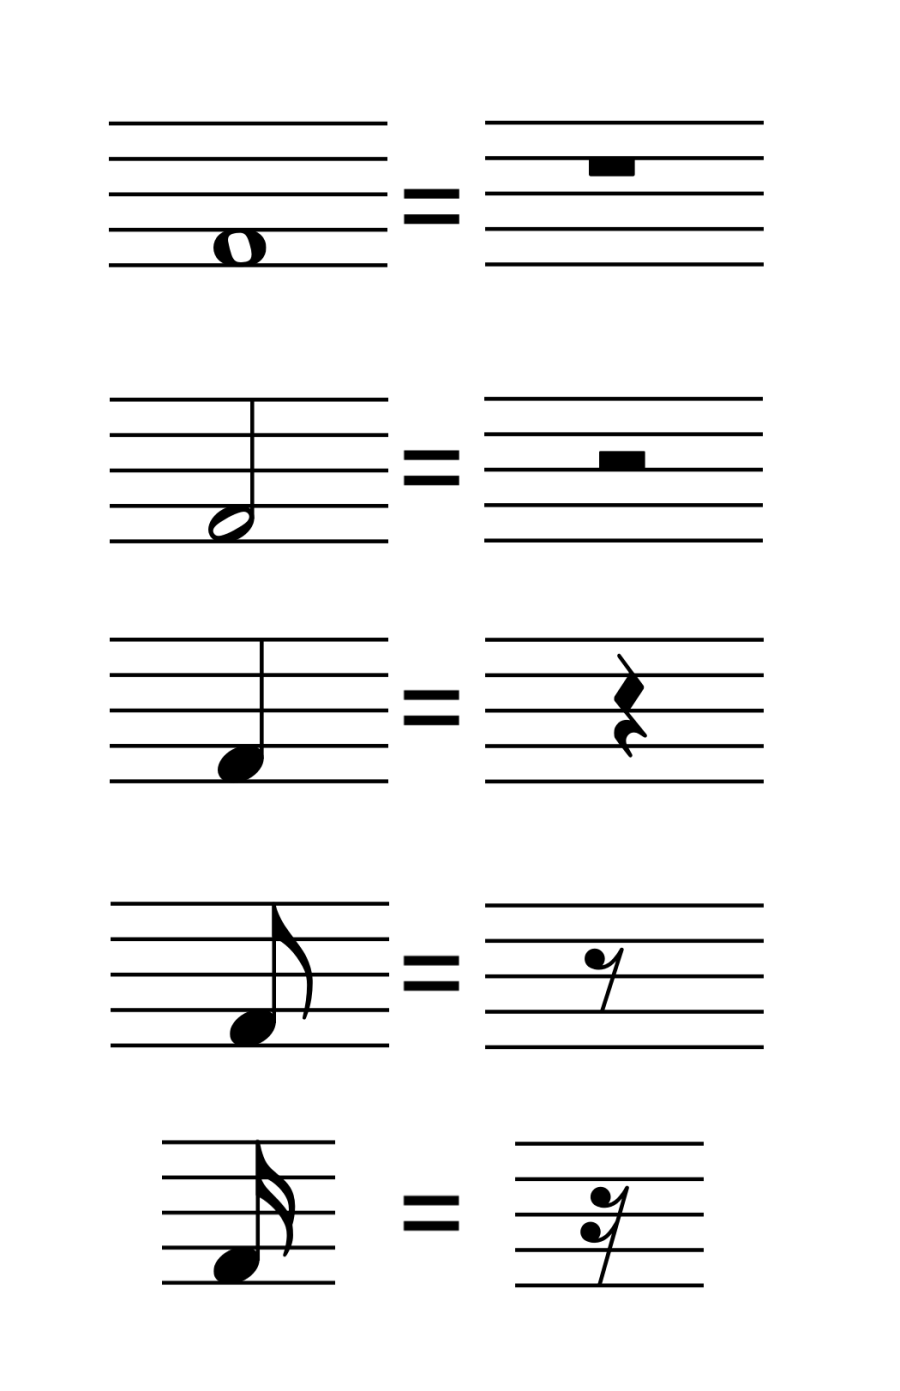
Each note carries two essential pieces of information: firstly,the pitch – that is, which key on the piano you need to play – and secondly, the note’s duration, known as the note value. The most important note values are:
Note Value
Duration
Symbolic Description
whole note
4 beats
Empty circle
half note
2 beats
Empty circle with a stem
quarter note
1 beat
Filled circle with a stem
eights note
½ beat
Like a crotchet, but with a flag
sixteenth note
¼ beat
Two flags
When several quavers or semiquavers appear in sequence, their flags are often connected with a beam – this makes the rhythm easier to read.
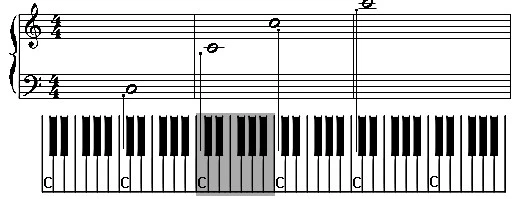
Pitches: The Names & Octaves of Notes
Each note represents not only a duration but also a specific pitch. This pitch is shown by the note’s position within the stave and is labelled with a letter: C, D, E, F, G, A, and H – the so-called natural notes.
These notes repeat regularly in different pitch ranges, known as octaves. On sheet music, a C can be written in a low, middle, or high register – depending on where it sits on the lines or spaces. This helps you find your way around the stave just as confidently as on the keyboard.
Note: Keyboard instruments can have different lengths, so don’t worry if you count more C notes than are shown in a diagram. Just look for a pair of black keys – the white key immediately to the left is always a C note.
Sharpened and Flattened Notes: Sharp (#) and Flat (♭)
Term
Sharp Notes: The Sharp Sign (#)
Flat Notes: The Flat Sign (♭)
Sound
Notes raised by a half step (sharp notes)
Example: C → C♯, D → D♯, etc.
Notes lowered by a half step (flat notes)
Example: D → D♭, E → E♭, G → G♭, etc.
Where on the keyboard
Black key immediately right if the white key
Example: The black key to the right of C is C♯
Black key immediately left of the white key
Example: The black key to the left of D is D♭
Notation
A sharp sign (#) before the note head
A flat sign (♭) before the note head
Account per octave
5 sharp notes per octave: C♯, D♯, F♯, G♯, A♯
5 flat notes per octave: D♭, E♭, G♭, A♭, B♭
Exercise: Find each black key on your keyboard and identify the white note to its immediate left and right. Now try naming that black key in both ways – as a sharp and as a flat.
Special Cases and Exceptions
A single black key can have two names, depending on the direction you're playing from – for example, C♯ and D♭. This is known as an enharmonic equivalent.
There are no black keys between E and F, or B and C. If one of these notes is raised or lowered, it becomes, for example, E♯ (equivalent to F) or F♭ (equivalent to E).
Step 6: Developing Rhythm and a Sense of Timing
The time signature is the heartbeat of any piece of music. It ensures that everything sounds structured and smooth. You’ve already learned: A bar consists of a certain number of beats. These are written as a fraction – for example, 4/4, 3/4 or 6/8. The top number tells you how many beats there are per bar. The bottom number indicates which note value counts as one beat.
„House of the Rising Sun“
„Nothing Else Matters“ (Strophe)
5/4 – Irregular & exciting
Jazz
„Take Five“ (Dave Brubeck)
Feeling Rhythm & Tempo Practically
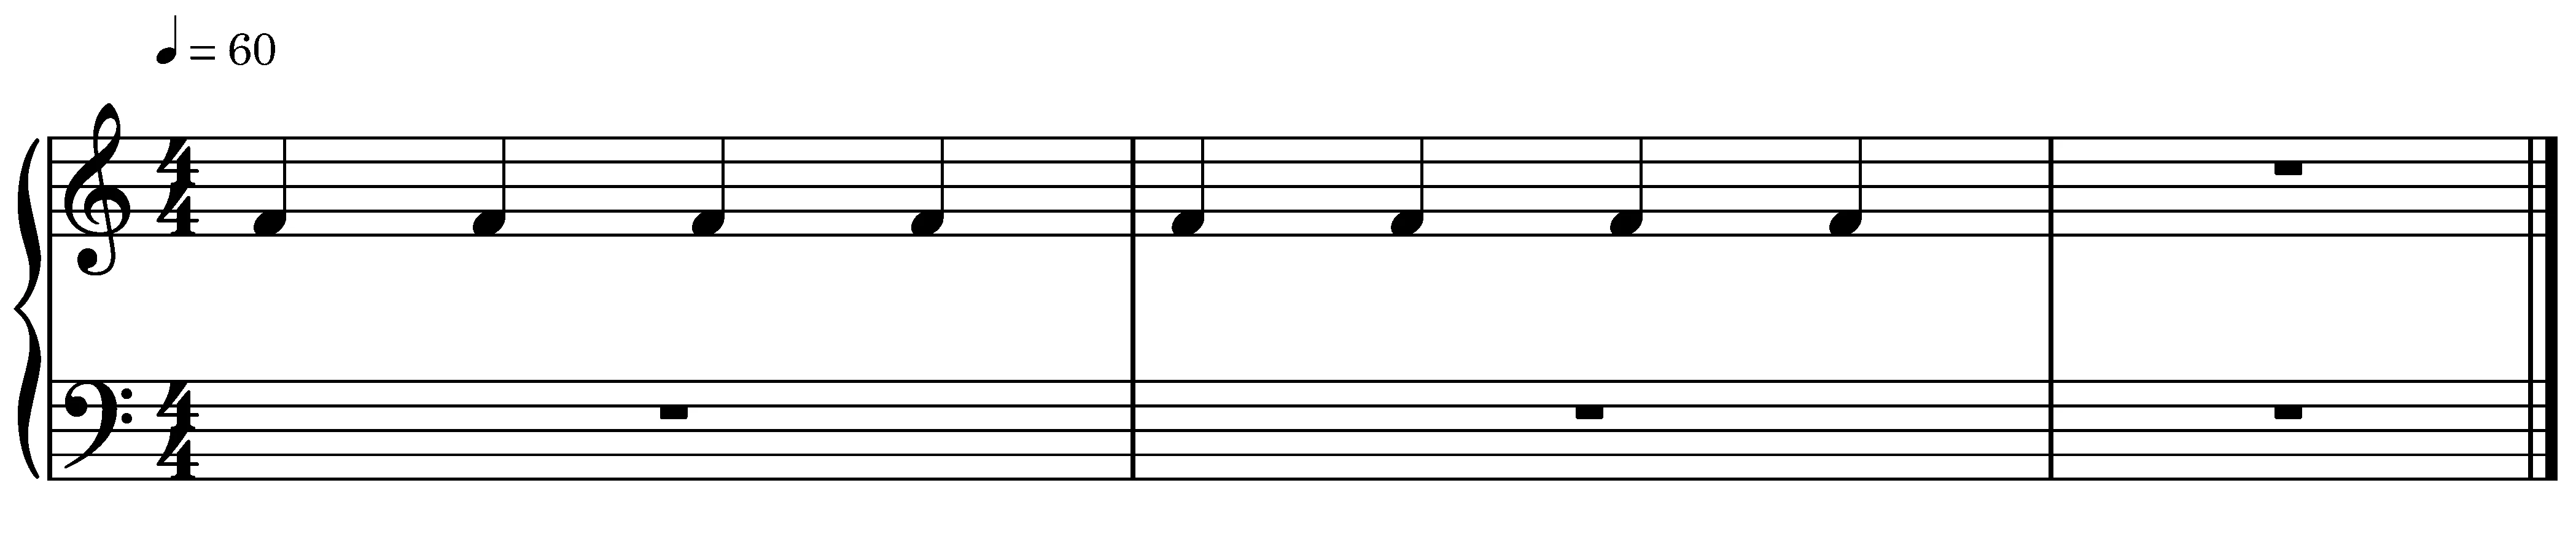
Tempo is expressed in beats per minute – each click you hear represents one beat. If it clicks once per second, the tempo is 60 beats per minute, or 60 BPM. The time signature “4/4” tells you that each bar must be four quarter notes long. The tempo tells you how quickly the quarter notes should be played one after another.
Exercise: Follow the metronome click closely – each click corresponds to the strike of a quarter note. With each click, tap your hand on your thigh and move your eyes from one quarter note to the next – until the end.
From Rhythm to Speech: Counting Methods & Syllables
There are many effective ways to internalise beats – one especially popular method is to count aloud rhythmically. Each beat is made audible and tangible by speaking numbers:
For example, in 4/4 time, you count from 1 to 4, with each number representing a basic beat.
If quavers (eighth notes) appear in 4/4 time, they fall between the main beats of the “1-2-3-4 grid”. So you help yourself by saying: “One and Two and Three and Four and One…
With semiquavers (sixteenth notes), you add an “e” between the numbers and the “and”. Spoken aloud, it becomes: “One-e-and-a Two-e-and-a Three-e-and-a Four-e-and-a”
A more playful way is to assign syllables or even words to note values – a method developed by composer and music educator Zoltán Kodály:
Crotchets (quarter notes): ta
Minims (half notes): ta-ja
Semibreves (whole notes): ta-ja-ja-ja
Quavers (eighth notes): titi
Semiquavers (sixteenth notes): tiri tiri
With enough practice, you can even invent your own words for the rhythms, as long as the syllables fit the timing. A popular option is using names, for example:“Cla-ra” for quavers, “Va-len-ti-na” for semiquavers.
Playing Rests
Rests are just as important as played notes – they have the same length:
Semibreve / rest: 4 beats
Minim / rest: 2 beats
Crotchet / rest: 1 beat
Quaver / rest: ½ beat
Semiquaver / rest: ¼ beat
Composers use rests to show where nothing should be played. The basic beat continues, but no note sounds during the rest.
Audio Example:
Here you can hear a typical example with crotchet rests. First, notice that it is written in 4/4 time. To give you a sense of the tempo of the 4/4 bar, we start with four clicks. This routine is also known as “counting in the bar”. Every musician needs to know the tempo before starting to play a piece. You can read more below about the different ways this can be done when you learn piano.
Step 7: Playing Your First Melodies with One Hand on the Piano
Now it’s time to get musical! In this step, you’ll play your first simple melodies – note by note, using one hand. While doing this, you'll learn how note values, pitch and rhythm feel in practice. We begin by focusing on reading smoothly and playing evenly – for example, using well-known children's songs or easy scales.
When you learn piano, you have to be able to read and play notes at the same time. This takes a bit of practice, but it’s definitely worth it! Take your time. Whether you need three minutes or ten doesn’t matter – what counts is that it eventually feels natural.
Beginner Exercise: Finding and Hearing the Notes
Place your right hand loosely and relaxed on the keyboard, as explained in Step 4. Make sure your fingertips rest gently on the keys without tension.
Play middle C twice in a row using your thumb.
Then play F twice using your ring finger. Make sure to keep a steady rhythm, a clear sound and relaxed fingers.
Your First Melodies
Now you're ready to try your first little melodies, such as “Twinkle, Twinkle, Little Star” or “Mary Had a Little Lamb.” These songs help you understand how written notes, pitch and rhythm work together.
While playing, pay close attention to the distance between two notes – this is called an interval. Whether you're moving from C to D or from C to G makes a big difference in sound. If you'd like to learn more about how to identify intervals, check out our magazine article on that topic.
Step 8: Playing the Piano with Both Hands – It’s Show Time!
When playing with both hands at the same time, it helps to keep the exercise as simple as possible. Break the piece down into small sections and follow this process:
Practise each hand separately
Practise slowly
Divide into short segments
Play without rhythm (note by note)
Only practisethe rhythm (clap or speak it)
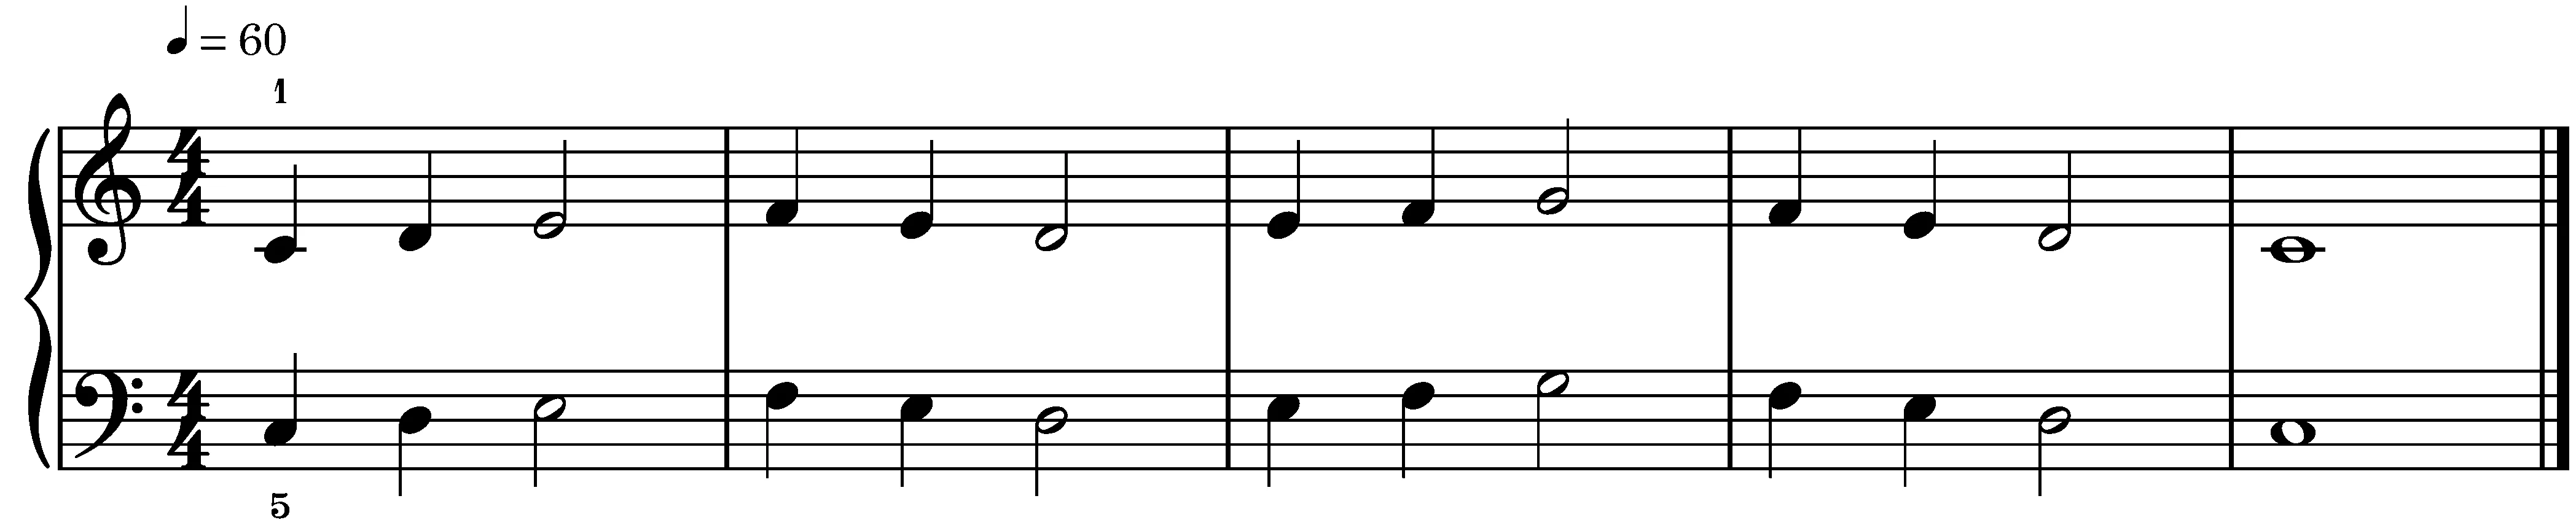
Looking at the sheet music example, you’ll notice that the right hand (usually the melody) is written in the upper stave and the left hand (often the accompaniment) is in the lower stave – just like you learned in Step 5.
Instructions for Playing the Piano with Both Hands:
Start with your right hand. Place your relaxed right hand in middle C position on the keyboard.
Now, play only the first bar slowly and note by note with your right hand. Press the keys C, D, and E in sequence. Use finger numbers 1–3 (thumb for C, index finger for D, and middle finger for E).
If it works well the first time, repeat this part three times without mistakes. If it doesn’t go well yet, think about what’s causing the issue – such as hand position or incorrect fingering. Correct it and then play the passage several times correctly.
Now prepare your left hand. Position it one octave lower than the right hand and place your little finger (5) on C.
Also play the first bar slowly with the left hand, pressing the notes C, D, and E in sequence.
Repeat this section with your left hand several times until you can play it confidently.
Next, bring both hands into their starting positions. Then, play the notes C, D, and Eat the same time with both hands.
Practise this section with both hands together until you can play it three times in a row without mistakes.
Step 9: Learn Piano Chords – Easy Song Accompaniment with Simple Shapes
With just a few simple chords, you can accompany many well-known songs – even if you’re not playing the full melody. To make your first steps easier, we’ve put together the most important piano chords for beginners.
Essential Beginner Chords
A chord is made up of at least three notes that sound harmonious together. On the piano, chords are usually played as triads – consisting of a root note, third, and fifth. Here’s an overview of the most useful major and minor chords, which you can play in your left hand using finger numbers 5 – 3 – 1:
Notes (Root Position)
Notes (Root Position)
Fingering (Left Hand)
C Major
C – E – G
5 - 3 - 1
F Major
F – A – C
5 - 3 - 1
G Major
G – B – D
5 - 3 - 1
A Major
A – C – E
5 - 3 - 1
D Major
D – F – A
5 - 3 - 1
E Major
E – G – B
5 - 3 - 1
Tip: For the left hand, it’s standard to use the fingering 5–3–1 (little finger, middle finger, thumb) for triads – as you learned in Step 4.
Simple Piano Accompaniment
You can accompany songs by playing chords in time with the beat. A good place to start is playing the full chord on beat 1 of every 4/4 bar (1 – 2 – 3 – 4). As you become more confident, try these variations:
Play the chord on every beat
Alternate between the bass note and the full chord
Loosen up the rhythm (e.g. by breaking up the chord into arpeggios)
Example: “Let It Be” (The Beatles) can be played with just the chords C, F, and G. This is one of the most common chord progressions in pop music. You can play the melody note in your right hand if you feel ready – or simply focus on keeping a steady rhythm with the left hand.
to view this content.
Step 10: Dynamics & Articulation – Bringing Music to Life
In this step, you’ll learn how to add more expression and personality to your piano playing. The way you shape dynamics and articulation makes your performance come alive – and it’s what will later set you apart from other musicians. Listen to different interpretations of the same piece. This will help you understand how music can sound completely different, even when everyone is playing the same notes.
Differences in dynamics:
Differences in articulation:
Dynamics: Volume and its changes
Dynamics refers to how loud or soft the music is played. You’ll find special abbreviations in the sheet music for this. Here’s a quick overview:
Abbreviation
Term
Meaning
fff
fortissimo possibile
as loud as possible
ff
fortissimo
very loud
f
forte
loud
mf
mezzoforte
moderately loud
mp
mezzopiano
moderately soft
p
piano
soft
pp
pianissimo
very soft
ppp
pianissimo possibile
as soft as possible
To indicate changes in volume, you’ll often see symbols like < (getting louder, crescendo) or > (getting softer, diminuendo). You might also see the words cresc. or dim. written out in the music.
Important: Your piano or keyboard should support touch sensitivity (also called velocity sensitivity) – only then can you control the volume through your fingers alone.
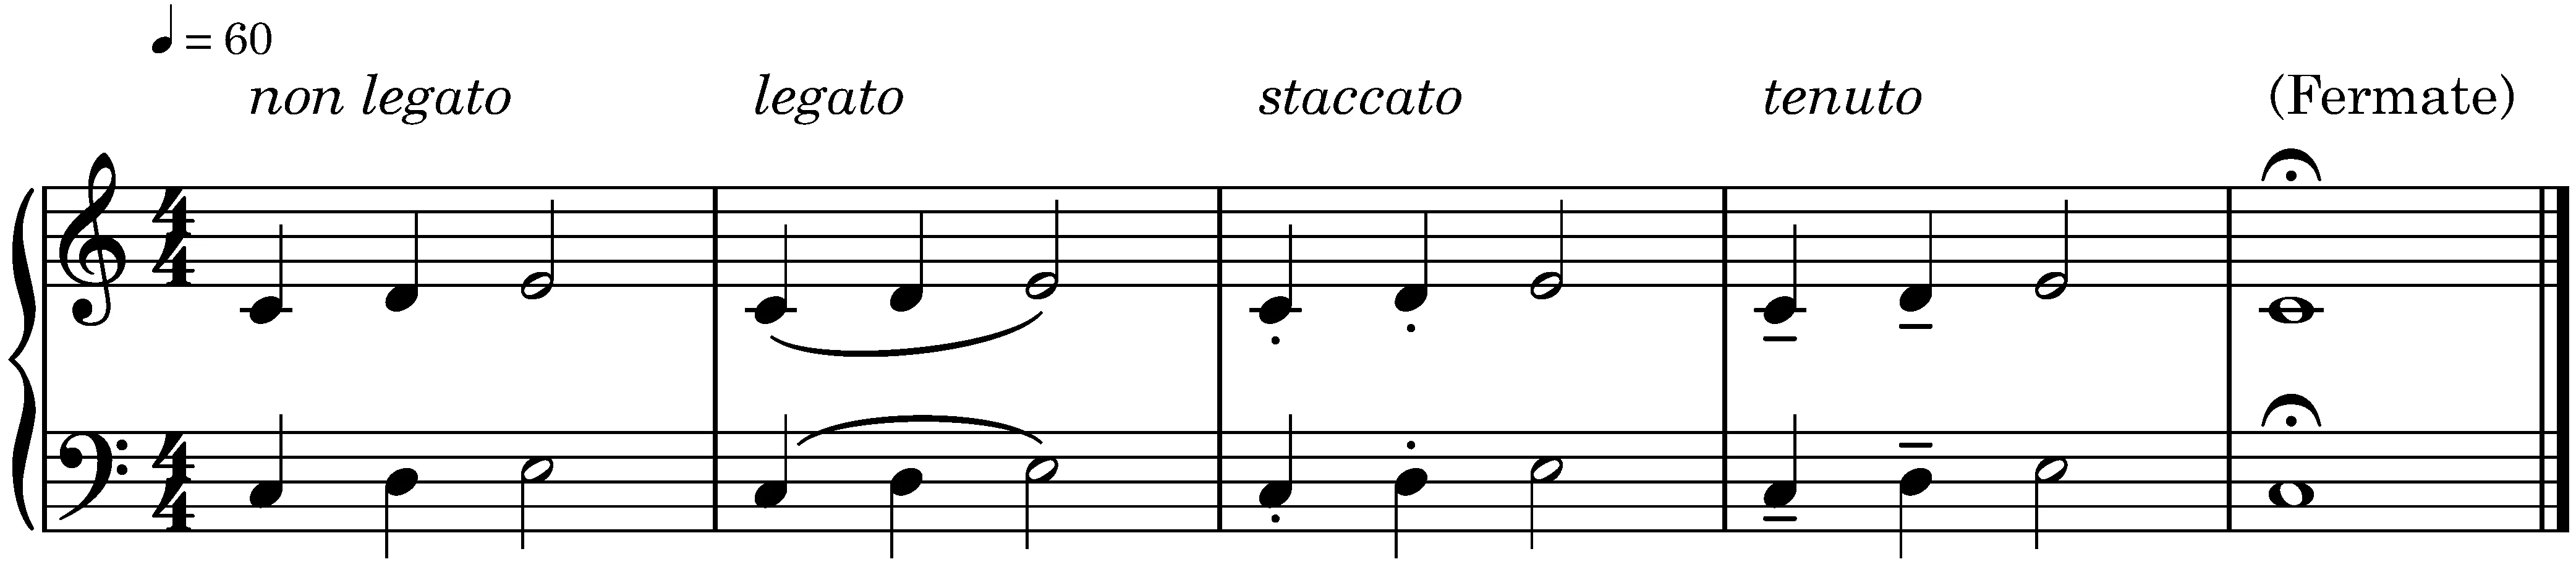
Articulation: How notes are played differently
Articulation describes how each note is played and connected. There are standard terms for this as well:
legato – smoothly connected
non legato – slightly detached
staccato – short and separated
tenuto – held and slightly emphasized
Another common symbol is the fermata (𝄐). It means the note is held longer than written (from the Italian fermare, meaning “to stop”). At the end of a piece, it feels like a musical full stop; in the middle, it often creates suspense or a moment of calm.
Tip: Don’t just practice your pieces technically but also experiment with dynamics, transitions, and articulation. That’s how you bring real emotion into your music – and that’s what makes playing piano so special.
Step 11: Introduction to Pedal Playing – Make Your Piano Sound Even Better
Using the pedal can give your piano playing a richer and more resonant character. The most important pedal for beginners is the right pedal – also known as the sustain pedal or damper pedal. It lengthens the sound of the notes and connects them smoothly. Especially at the beginning, you should use the pedal deliberately, because it can quickly make the sound “blurred” if overused.
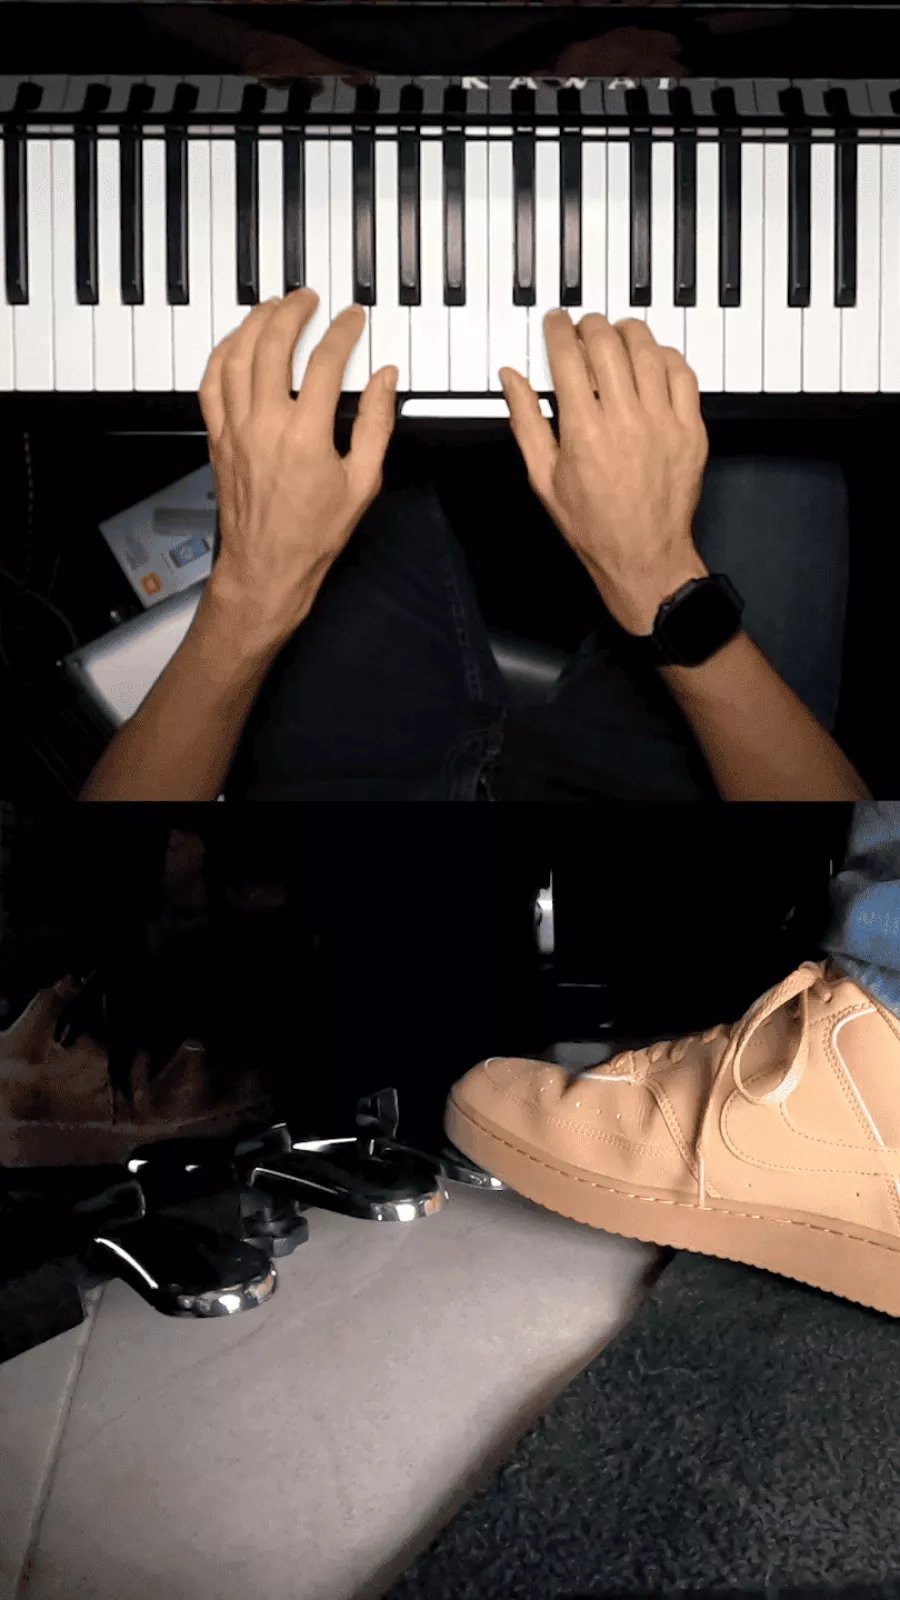
How to use the pedal:
Press the piano key.
Then press the pedal.
Lift the pedal shortly before playing the next chord or note.
Important: Don’t press the pedal at the exact same time as the key. Instead, slightly delay it. This technique is called pedal change, and it prevents tones from overlapping.
Typical uses of the pedal:
Chords: to let them ring out and sound more harmonious
Melodies: to connect notes smoothly and bridge small pauses
Soundscapes: in romantic or expressive pieces for a warm, sustained atmosphere
Practice Tip: Play a simple chord and hold it with the pedal. Listen carefully to how the sound resonates. Then switch to the next chord and reset the pedal just in time to avoid a blurred sound.
Step 12: Practice with a Plan – Stay Motivated & Make Real Progress
Regular practice is the key if you truly want to learn how to playpiano. Keep applying and improving all techniques from Step 4 to Step 11. It’s not about practicing for hours, but about smart, consistent, and varied sessions.
Practice regularly – in small chunks: 20–30 minutes a day is usually more effective than one long session per week. Your brain learns better in small, steady steps.
Set concrete, small goals: Instead of “I want to learn to play piano,” aim for “Today I’ll play the first bar without mistakes” or “By Friday, I’ll play the piece slowly from start to finish.” Small wins keep you motivated.
Mix it up: Divide your practice time wisely: warm-ups, familiar pieces, new material, and free playing or improvisation
Track your progress: Write down what went well and what needs improvement. Seeing your growth in writing boosts motivation!
Be patient: Not every day will bring instant results. Stay patient – progress always comes with time.
In our magazine and online piano course, you’ll find a wide variety of sheet music and video tutorials. Start with easy beginner pieces to build your skills step by step. Once you gain confidence, you can gradually work your way up to more complex works – maybe even some of the most challenging piano piecesever written.
3 Effective Tips for Staying Motivated
Only five minutes: Not in the mood or frustrated because things didn’t go well recently? Just aim to play for five minutes. That’s manageable – and often you’ll end up playing longer once you get started.
Get inspired: Listen to other pianists – on YouTube, Spotify, or your favorite streaming service. Maybe a film soundtrack you liked? After a few songs, you’ll probably feel the urge to play again.
Reward yourself: Connect practice with a reward: 15 minutes of piano, then a favorite TV show or that chocolate bar you’ve been eyeing all day. Small rewards help turn practice into a good habit.
Step 13: Care for your piano – to keep it sounding beautiful for a long time
Your piano is your musical companion, and to ensure it stays with you for a long time and sounds beautiful for years, it needs regular care and attention.
Tuning the piano A well-tuned piano sounds better and makes practising more enjoyable. It’s best to have your piano tuned by a professional every six to twelve months. Temperature fluctuations and dry air can quickly cause it to go out of tune.
Cleaning the piano Keep your piano clean by wiping it regularly with a soft, dry cloth. Avoid harsh cleaning products, especially on the keys. Make sure to place your instrument in a room with a stable temperature and humidity between 40 and 60 percent. Direct sunlight or proximity to heaters can damage the wood and mechanics.
Repairs by a professional If your piano makes unusual noises or shows technical problems, it’s best to consult a professional. Attempting repairs yourself can cause more harm than good.
Playing the piano with patience and joy
Learning to play the piano is a rewarding and creative journey that requires both patience and perseverance. From first getting to know the keyboard, reading music, and developing a sense of rhythm, to chords, pedal technique and expression – all these steps build systematically on each other.
With regular practice, a trained ear for sound and dynamics as well as the willingness to keep improving, you will steadily make progress. It’s important to take your time, focus on each learning step and never lose the joy of music.
Frequently Asked Questions about Learning the Piano
When can you start to learn piano?
You can learn piano at any age – whether as a child, teenager, or adult. What matters most is motivation, patience, and regular practice, not age.
Am I too old to learn the piano?
Not at all! The brain remains capable of learning throughout life – thanks to neuroplasticity. In fact, adults often have key advantages: discipline, musical listening experience, and clear goals. What matters most is regular, short practice sessions (10–15 minutes a day) and a course that guides you step by step.
How long does it take to learn piano?
You can often play your first simple songs after just a few weeks. However, for a solid foundation in technique, reading sheet music and musical expression, expect to spend several months to years.
Is it hard to learn to play piano?
Piano is accessible for beginners since notes are heard immediately and the instrument is logically arranged. With patience, enjoyment, and regular practice, you will make steady progress, even if it seems challenging at first.
Do I have to be able to read music to play piano
Reading music is very helpful for playing piano, as it gives you access to countless pieces. For beginners, you can also start with simple finger patterns or learn by ear and deepen your sight-reading later.
I usually play piano pieces by memory. How can I better understand the music itself?
To change this, it’s worth gradually connecting music theory with your playing. Learn which chords appear in a song and how they change throughout the piece. Analyse the song structure – how verses, choruses and other parts are built. Practise the piece first as a chord progression without the melody, then play both together. This helps you link sound and theory in your mind, making you more confident and creative at the piano.
There are so many piano tips out there – what should I really focus on?
When it comes to learning piano, consistency beats complexity. Instead of constantly trying new tutorials or methods, it’s better to follow a clear course plan and commit to daily practice, even in short sessions. Track your progress – for example, with regular recordings or structured exercises – and stick with it. Quality matters more than quantity: one solid course that you follow consistently will take you much further than dozens of random tips you only half try.
How do I know if I’m really making progress in learning piano?
Progress on the piano is often subtle, but you can make it more visible with clear milestones. Use a metronome to track your tempo: play a tricky section slowly at first (e.g. 80 BPM), then gradually increase it to 100 BPM. Record yourself once a month and listen back to compare. Features like badges and skill checks in courses such as music2me also help you measure your development using level-up statistics – making your growth more tangible and keeping you motivated.
Blues is the root of almost all modern music and has produced countless legendary tracks that became immortal on six strings and 88 keys. In this article, we present 10 unforgettable blues and blues‑rock songs every musician should know.